From Friday, April 19th (11:00 PM CDT) through Saturday, April 20th (2:00 PM CDT), 2024, ni.com will undergo system upgrades that may result in temporary service interruption.
We appreciate your patience as we improve our online experience.
From Friday, April 19th (11:00 PM CDT) through Saturday, April 20th (2:00 PM CDT), 2024, ni.com will undergo system upgrades that may result in temporary service interruption.
We appreciate your patience as we improve our online experience.
There are a variety of methods for deploying LabVIEW Real-Time applications, each with a different set of advantages and disadvantages. This paper explains one such method, known as application components, which was introduced in LabVIEW 2011.
Application components, which are configured during the LabVIEW Real-Time build process, are a useful way to encapsulate a LabVIEW Real-Time application. Also referred to as component definition files (CDFs), application components can be used directly in Measurement and Automation Explorer (MAX), or in custom deployment utilities created with the NI System Configuration API. Application components are a lightweight and flexible alternative to system images as they are often much smaller in size than images, and can be deployed to different controller models unlike images.
Note: CDF support for all CompactRIOs ends in the 2021 NI Software Release and for all PXIs ends in the 2022 NI Software Release. To continue using application components, please migrate to ipks and refer to NI Linux Real-Time and opkg: Introduction to ipks.
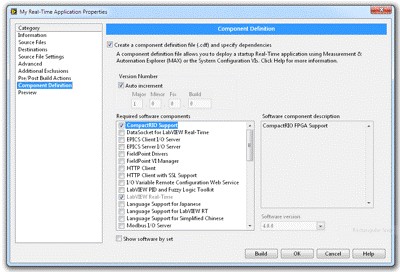
When creating a build specification for your LabVIEW Real-Time application, you can choose to optionally create an application component by defining the parameters for a component definition file (CDF). A CDF stores the real-time application, version information corresponding to your LabVIEW Real-Time executable, and any dependency information specified. To learn more, please refer to the Component Definition Page help document and the Deploying from outside of the LabVIEW Development Environment section of the Building and Deploying a Stand-Alone Real-Time Application help document.
Figure 1. Use the Component Definition menu when configuring a LabVIEW Real-Time build specification to create a CDF, define application version information, and declare any software component dependencies.
Note that driver and component dependency information is not automatically detected based on the real-time application. To have the resulting CDF impose dependency requirements during deployment, one must explicitly select dependencies. When selecting dependencies, one can elect to either manually define the minimum versions for each dependent component or rely on the versions defined by a recommended software set. To protect against accidental version upgrades in dependencies when deploying, and for the highest reliability, it’s strongly recommended that users rely on a recommended software set.
Using the Source Files and Destinations categories in the build specification process, one can also include packed project libraries, configuration files, web services, and more to be deployed along with the LabVIEW Real-Time application using a CDF. When finished with configuration, the built component definition file will be automatically saved in a subdirectory within the local RT Images directory. By default, on Windows machines, this directory is set to C:\Program Files\National Instruments\RT Images\User Components.
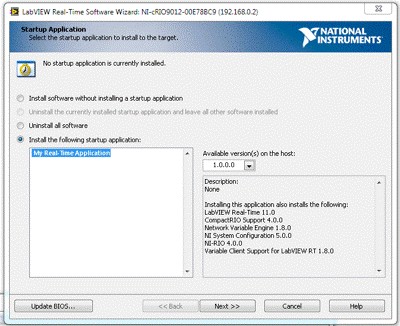
If you have one or more CDFs stored in your local RT Images directory, the MAX Add/Remove software dialog will differ from the standard LabVIEW Real-Time software installation experience. A prompt to choose a LabVIEW Real-Time application defined by available CDFs on the system will be presented, and the option to ‘Install the following startup application’ will be selected by default. One can return to the familiar Add/Remove Software screen to manage system software on a real-time target by selecting the option to ‘Install software without installing a startup application’. Continuing with the ‘Install the following startup application’ option allows users to install an application component with MAX.
Figure 2. After you have created one or more CDFs, the Add/Remove Software dialog in MAX will list all of your LabVIEW Real-Time applications and versions so that you can quickly deploy your application component in addition to managing other system software.
Application components are best suited for quickly delivering small updates to deployed embedded systems. They are generally much smaller than system images, can be deployed much more quickly, and can be applied without deleting support files on the target such as data log files or other configuration files. Additionally, unlike system images, application components do not require users to first deploy to a real-time target from the LabVIEW Project – they can instead be built directly from the LabVIEW Project, reducing the number of steps in the deployment/update workflow. Application components also do not restrict deployment to the same controller model used in development, offering more flexibility than system images which strictly enforce deployment of system images to the exact same controller model. Lastly, application components also provide a more seamless solution for managing version information.
Despite the numerous benefits of application components it’s important to note that they are not always the best solution for deployment. It’s highly recommended that for initial real-time system deployment and replication is done using system imaging as application components fail to capture all aspects of a real-time application. Note that application components do not have the capacity to deploy any project configurations, such as shared variables, NI Scan Engine settings, and custom motion axes. The best practice is to rely on a system imaging solution such as the replication and deployment utility (RAD) to deploy project configurations. Refer to Table 1 for a list of all the limitations to application components.
| Limitations of Application Components |
| Choose whether or not to reinstall a dependency specified as part of a CDF when the dependency is already installed on a LabVIEW Real-Time target |
| Deploy shared variables or configure the NI Scan Engine |
| Specify hardware target dependencies |
| Deploy FPGA bitfiles to the flash memory onboard RIO hardware targets |
| Deploy software components to multiple hardware targets in parallel |
Table 1: Limitations of application components (CDFs) as of LabVIEW 2012
There are many methods for deploying LabVIEW Real-Time applications and replicating LabVIEW Real-Time systems. Alternatives to application components include LabVIEW interactive deployment, programmatic imaging using System Configuration VIs, and the Replication and Deployment (RAD) Utility. The best practice is to rely on system imaging solutions such as the RAD utility for deployment, replication, and updating real-time systems. Use application components only when there are specific needs which cannot be met by system imaging.