Simplify the Deployment and Replication of Distributed Systems
Overview
Deploying embedded devices to remote networks presents numerous management challenges, including monitoring system health, performing remote configurations, executing diagnostics and troubleshooting functions, and deploying software installations and updates. This document explores the options the NI software portfolio provides to tackle distributed system management challenges.
Contents
- Web-Based Configuration and Monitoring Utility
- Replication and Deployment Utility
- Systems Management Software
- Programmatically Incorporating Performance Monitoring in Remote Targets
- Programmatic Access
- Real-Time Trace Viewer
- Distributed System Manager
- NI MAX System Information
- Additional Resources
Web-Based Configuration and Monitoring Utility
The web-based configuration and monitoring utility installed in remote NI targets provides information on those targets using a commercial browser. You can use this utility to configure and monitor a device remotely. It provides information on the following:
- System Settings—Configure system and startup settings and monitor system resources.
- Remote File Browser—Access the file system of the remote device.
- Security—Configure passwords, users, user groups, and permissions.
- Web Services Management—Manage deployed web services.
- Time Configuration—Configure the time and date of the target.
- Software Management—Visualize software installed in the target.
- Network Configuration—Configure the network adapter settings.
Learn more about the web-based configuration and monitoring utility
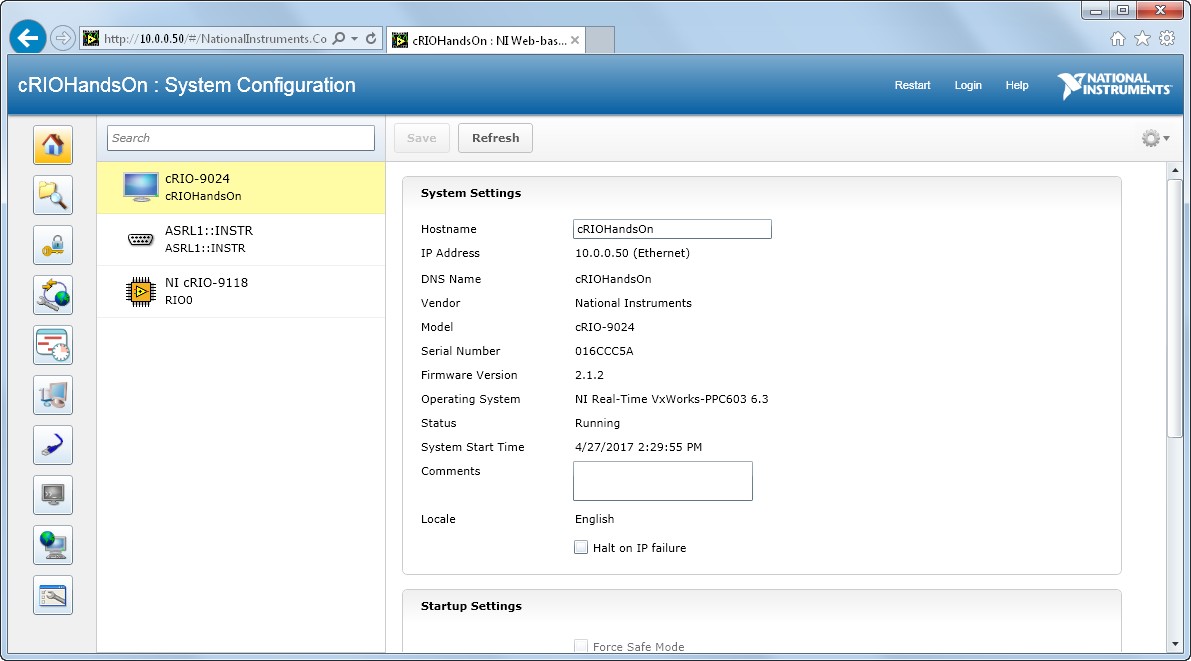
Figure 1: With the web-based configuration and monitoring utility, you can configure settings and visualize parameters on a remote target.
Replication and Deployment Utility
Imaging is an effective tool for managing the software deployments of real-time (RT) targets. Being able to replicate the image of an RT target makes deploying targets and systems easier and more efficient. Whether you are making periodic backups of a system, deploying from a developed system to many new ones, updating an image on a target, or giving someone else the tools to duplicate a working system, replicating an image makes all of these applications possible. However, building a robust application to automate application deployment and management of RT targets with imaging APIs is not a trivial undertaking. The Replication and Deployment (RAD) Utility provides a turnkey solution for automated RT image deployment, replication, and management. It is built using System Configuration VI functionality.
When replicating applications from one target to another, you retrieve the application image from one RT target and copy it to another. An application image comprises the contents (all the files and directories) of the hard drive of an RT target that define the behavior of the RT target as well as any bitfiles set to deploy to FPGA flash memory. You can organize application image versions by both creation date and version number and compare them using the RAD Utility to help the user reap the benefits of source code control for configuration management. To learn more about how to use this utility, refer to this example.
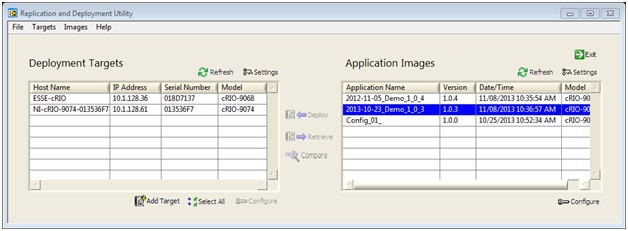
Figure 2: The Replication and Deployment Utility allows you to effectively manage the software deployments of real-time targets.
Systems Management Software
SystemLink provides centralized management capabilities for distributed test, measurement, and control solutions. An intuitive web application lets you manage a group of networked systems with functions that include software deployment, device configuration, and diagnostics. SystemLink also provides secure, scalable data services and LabVIEW APIs. Supported hardware includes PXI (Windows), CompactRIO (NI Linux Real-Time), and Windows PCs.
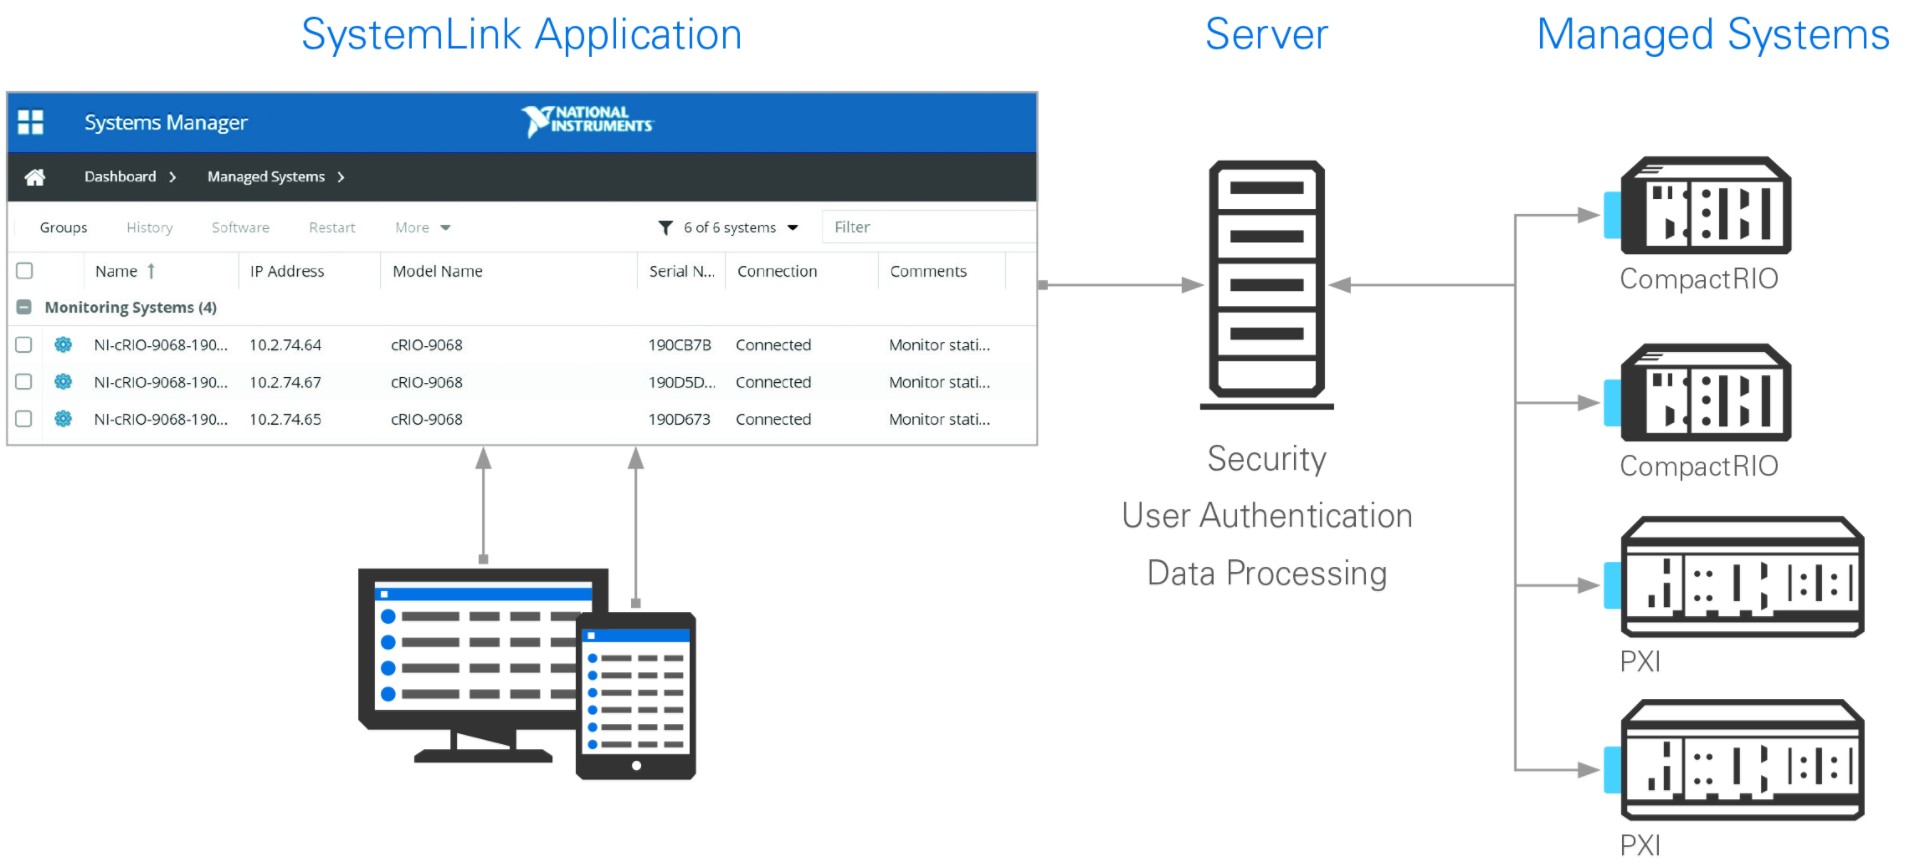
Figure 3: SystemLink and LabVIEW enable the mass coordination of connected devices, software deployments, and data communications throughout a distributed system.
Programmatically Incorporating Performance Monitoring in Remote Targets
When working with real-time systems, developers seek to ensure applications behave reliably by not overloading their system’s resources. While scheduling determines which tasks the real-time processor performs, it is impossible to predict how the system will behave if the processor is overloaded. As noted in the CompactRIO Developer’s Guide, National Instruments recommends keeping CPU usage below 70% while also ensuring enough system memory remains for desired system operations. To help users monitor their real-time targets, NI provides different methods to access system resource information.
Programmatic Access
Programmatic access to a target’s resources allows you to create code that can adapt to changing conditions. For example, you can modify a large project to alter its behavior if a certain resource threshold is reached. This ability to change the demands made on a real-time target can help ensure that high-priority tasks continue to execute. Moreover, direct access to CPU and memory information provides the opportunity to create custom monitoring and logging tools. In LabVIEW, the System Configuration API and RT Utility VIs help you access a target’s system resources.
RT Utility VIs
Located in the RT Utilities palette, the RT Get CPU Loads VI provides a large swath of CPU usage information. This VI allows you to see more than total CPU usage by publishing the computational activity associated with different priority tasks. With this information in hand, you can determine if certain processes are receiving adequate resources and isolate problems in larger projects. As seen in Figure 4, this VI outputs an array of clusters, with each element providing information about the corresponding core.
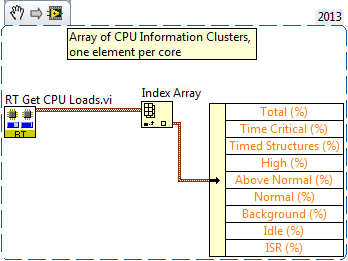
Figure 4: Using the RT Utilities VIs.
System Configuration API
When you are using NI hardware, the NI System Configuration API provides you with the ability to configure, locate, image, and communicate with your devices. To work with this API, you must have the System Configuration software installed on your real-time targets. Figure 5 shows how you can install this add-on via the LabVIEW Real-Time Software Wizard.
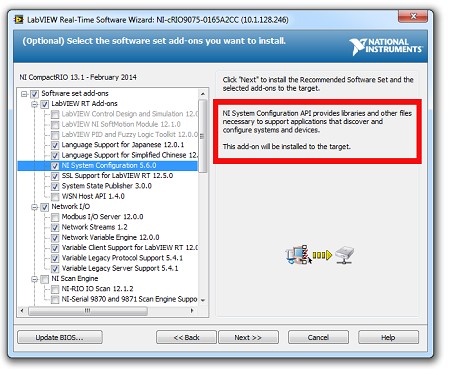
Figure 5: Installing the System Configuration API.
You can use a System Session property node, Property Node (System).vi, to access information about a device’s volatile and nonvolatile memory. Figure 6 shows how the Initialize Session VI provides the appropriate target reference for this property node. When configuring the System Session property node, you can find memory information under the System Resources heading.
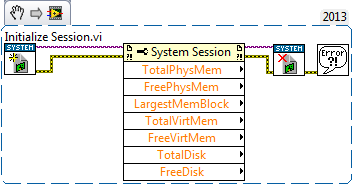
Figure 6: System Session Property Node.
Additionally, you can use Find.vi to extract the necessary hardware references to execute System Hardware property nodes such as Property Node (Hardware).vi. Figure 7 shows how System Hardware property nodes provide further insight into a target’s behavior. However, you must be careful with which hardware resources you pass to the property nodes.
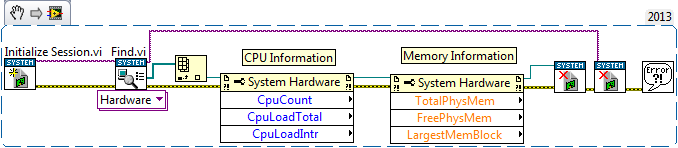
Figure 7: Using property nodes to monitor target’s behavior.
When working with property nodes, be sure to follow best programming practices and close references using the System Configuration API’s Close.vi. Also, memory reporting for NI Real-Time Linux OS targets differs from expected behavior and is outlined in this KnowledgeBase article.
Real-Time Trace Viewer
The NI Real-Time Trace Viewer, included with the LabVIEW Real-Time Module, provides developers with a low-level analysis and benchmarking tool. With the Real-Time Trace Viewer, users can identify memory allocation, view specific thread activity, and closely review execution and timing data for individual CPUs.
Working with the Real-Time Trace Viewer involves both adding the appropriate VIs to the code executing on a particular target and then reviewing with the files created by the RT Execution Trace Viewer VIs. The system traces created while code executes on the target can either be stored locally or sent to a host computer. For an overview of how to use this low-level, system resource analysis tool, please look through one of the related examples in the LabVIEW Example Finder.
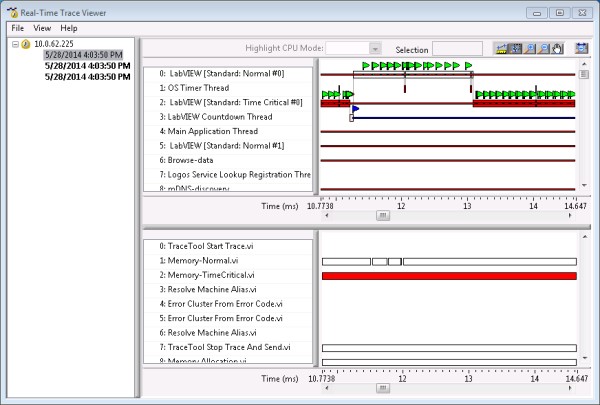
Figure 8: Real-Time Trace Viewer.
Moreover, the toolkit allows developers to generate custom event flags that are viewable while reviewing trace sessions. You can use the TraceTool Log User Event.vi to help focus your attention when looking to identify system resource allocation in a specific area of a program.
Notice that in LabVIEW Real-Time Module versions 2013 and earlier, the packaged the Real-Time Trace Viewer was a separate toolkit (Real-Time Execution Trace Toolkit).
Distributed System Manager
Instead of developing custom monitoring software, users can rely upon the LabVIEW ecosystem’s monitoring tools- such as the Distributed System Manager. The Distributed System Manager (DSM) allows engineers and technicians to view information published to the network by different NI products. When used in conjunction with the System State Publisher software, a user can view critical CPU and memory availability information. Not only does the DSM provide users with detailed information such as the percent of CPU used by Time Structures and the largest contiguous memory block available, the total memory and CPU data is tracked by twin charts.
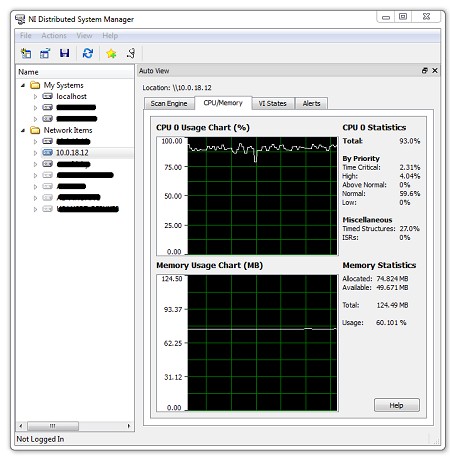
Figure 9: Distributed System Manager
To use the DSM, the System State Publisher must be installed on the real-time target of interest. As seen below, the LabVIEW Real-Time Software Wizard allows you to install System State Publisher add-on, which publishes all of the required information to the DSM.
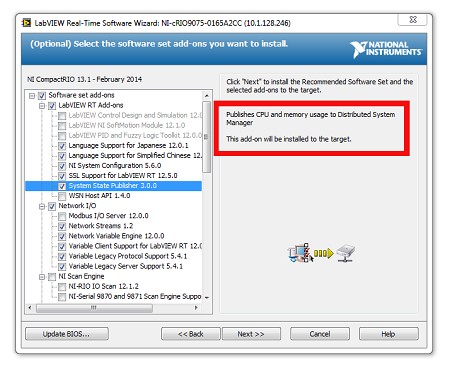
Figure 10: Installing the Distributed System Manager
NI MAX System Information
While NI MAX does not provide the depth of information made available by the Distributed System Manager, it can provide a helpful system health snapshot. To access this information, please open MAX and select a real-time system from the Remote Systems heading. The System Resources section can be found in the System Settings tab, which displays by default after selecting a target.
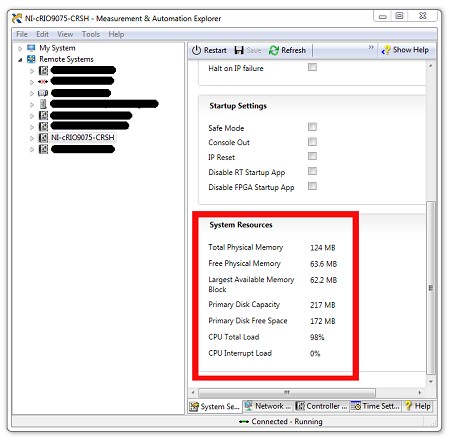
Figure 11: NI MAX System Information