From Friday, April 19th (11:00 PM CDT) through Saturday, April 20th (2:00 PM CDT), 2024, ni.com will undergo system upgrades that may result in temporary service interruption.
We appreciate your patience as we improve our online experience.
From Friday, April 19th (11:00 PM CDT) through Saturday, April 20th (2:00 PM CDT), 2024, ni.com will undergo system upgrades that may result in temporary service interruption.
We appreciate your patience as we improve our online experience.
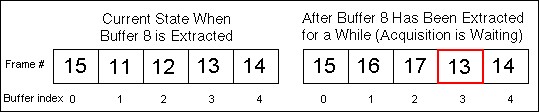
A ring acquisition consists of a buffer list with multiple buffers for storing images. The following figure shows how a buffer list might look for five allocated buffers. As the acquisition begins, images 0 through 4 fill up the buffer list. As more images are acquired, they overwrite the old images in the buffer list with new images. This process continues until the acquisition stops. Refer to the System Memory Versus Online Memory section of this document for more information about how images are examined during acquisition.
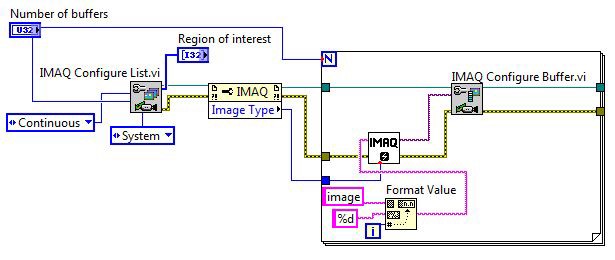
All IMAQ acquisitions begin by using IMAQ Init (for LabVIEW) or imgInterfaceOpen and imgSessionOpen (for C) to initialize the IMAQ device. Once the device is initialized, you can configure a ring acquisition. Use the buffer list to allocate the number of images you want in the ring acquisition. The more buffers you allocate, the more time before the list fills with images. When acquisition is faster than image processing, keeping up is impossible, regardless of the number of buffers allocated. As a result, you typically need to allocate only three to five buffers. The buffers serve as a cushion for when the operating system multitasks, which sometimes results in processing taking longer. As long as the average processing time is less than the acquisition rate, the extra buffers help keep the acquisition from catching up to the buffer being processed.
When configuring the buffer list, you can assign a different channel to each buffer for multiple channel devices. You can also specify a skip count for each buffer so it will skip some images before it fills up. The skip count is typically set to 0 for each image and only one channel is used for all buffers.
Because images take up a large amount of memory, IMAQ allows you to manage the memory since you can do this more efficiently than the operating system. The following figure and code snippets for LabVIEW and C illustrate how to set up a standard ring buffer list.
static BUFLIST_ID Bid;
static SESSION_ID Sid;
static INTERFACE_ID Iid;
static Int8* ImaqBuffers[NUM_RING_BUFFERS];
// Create a buffer list with n elements
imgCreateBufList(NUM_RING_BUFFERS, &Bid);
imgGetAttribute (Sid, IMG_ATTR_BYTESPERPIXEL, &bytesPerPixel);
bufSize = AcqWinWidth * AcqWinHeight * bytesPerPixel;
/* The following configuration makes theseassignments to the buffer list
elements:
*/
for (i = 0; i < NUM_RING_BUFFERS; i++)
{
imgCreateBuffer(Sid, IMG_HOST_FRAME, bufSize, &ImaqBuffers[i]);
imgSetBufferElement(Bid, i, IMG_BUFF_ADDRESS, (uInt32)ImaqBuffers[i]);
imgSetBufferElement(Bid, i, IMG_BUFF_SIZE, bufSize);
bufCmd = (i == (NUM_RING_BUFFERS - 1)) ? IMG_CMD_LOOP : IMG_CMD_NEXT;
imgSetBufferElement(Bid, i, IMG_BUFF_COMMAND, bufCmd);
}
// Lock down the buffers contained in the buffer list
imgMemLock(Bid);
// Configure the session to use this buffer list
imgSessionConfigure(Sid, Bid);
Both methods allocate the memory inside a For loop and assign properties to each buffer in the list.
See Also:
Ring
System memory means that the buffer list is allocated in the computer memory. Onboard memory refers to the memory allocated on the IMAQ device. The IMAQ 1409, 1411, 1422, 1424, and 1428 have 16 MBytes of onboard memory. The IMAQ 1424 can be upgraded to 80 MBytes of onboard memory.
Extract and Copy (described below) are the two methods for examining data when acquiring to system memory.
Extract
Once you set up the buffer list and start the acquisition, the buffers begin to fill and you can use IMAQ Extract (LabVIEW) or imgSessionExamineBuffer (C) to access the image data. The Extract function uses the buffer from the buffer list and locks it out of the acquisition loop to prevent the hardware from overwriting the buffer while it is in use. The acquisition continues until it circles around the buffer list and gets to the extracted buffer. It then waits until that buffer is replaced in the list before writing more buffers. When you call Extract again, the previously extracted buffer is reinserted, and the requested buffer is extracted so that only one buffer is extracted at a time. The buffer number is one of the Extract parameters. If you specify a number larger than the current image, the acquisition waits until it acquires that buffer and then locks it out to prevent it from being overwritten.
Specifying a number that is currently in the buffer list locks it out and prevents it from being overwritten. Specifying a buffer that has already been overwritten locks out the buffer that is currently in the same buffer index as the requested image.
Note: IMAQ Extract uses memory that the IMAQ device writes to when acquiring. As a result, any processing done on that buffer is overwritten when the buffer is released. If you need the image for extended periods of time, make a copy of the image to a user-defined memory location and then reinsert the buffer list image back to prevent the acquisition from being held up waiting for that buffer to be released.
Copy
You can also use IMAQ Copy (LabVIEW) or imgSessionCopyBuffer (C) to copy the requested buffer to a user memory location. Like the Extract function, the Copy function allows you to specify a buffer number, but Copy requires that you pass in another image buffer to copy the data into. The Copy function is slower than the Extract function because it copies all the data to another location rather than using the memory that is already filled with the image. Additionally, Copy does not stop filling buffers in the list if you are examining a particular buffer, since you are not extracting the acquisition buffer, which makes it more difficult to control the acquisition flow and introduces the possibility of missing frames without knowing it.
Onboard acquisitions only work using Copy. When using onboard memory to store images, you cannot access and analyze data on the IMAQ device. You must copy the data from the device onboard memory to a buffer in system memory. Only images that are copied are transferred over the PCI bus. As a result, using onboard memory could help reduce PCI traffic if you do not need every image. The only difference between programming a system memory acquisition and an onboard acquisition is setting the memory location (to system or onboard) when calling IMAQ Configure List (LabVIEW) or imgCreateBuffer (C), and using Copy or Extract to get your images. Copy requires that you have a user-defined buffer for saving the image.
IMAQ devices also take advantage of onboard memory to prevent images from being lost. If you extract an image and do not reinsert it before the acquisition fills the remaining buffers in the list, IMAQ devices with onboard memory (1409, 1411, 1422, 1424, and 1428) save images in onboard memory. As you read images from the buffer list, the IMAQ device transfers images to your buffer list as buffers in the list become available for writing, which increases the number of buffers you have before images are lost. When the onboard memory is full because an image is extracted for extended periods, the acquisition begins to lose any newly acquired frames because there is no more room to save them. This process continues until the extracted buffer is released and acquisition can begin going around the ring again overwriting images with newer ones.
Timeout errors are common when you trigger the buffers at infrequent intervals, or when frame rates are very slow because of integration times or large image sizes. The timeout timer begins counting as soon as you request an image with either Copy or Extract. Additionally, an error occurs if the entire image does not finish filling the buffer by the timeout value. To avoid this error, do not request a buffer until you know a new one is available, and then when you use Copy or Extract, you know the image is already there. You can use this method by periodically polling the last valid frame. When it changes, you know a new image is available.
For IMAQ devices with onboard memory, you can use a ring acquisition to monitor whether a frame is lost by reading the attribute that provides the lost frame number.