NI-VISA Utilities
- Updated2025-01-24
- 4 minute(s) read
NI-VISA Utilities
NI-VISA provides the following utilities.
NI I/O Trace: Debugging Tool
NI I/O Trace tracks the calls your application makes to National Instruments test and measurement (T&M) drivers, including NI-VXI, NI-VISA, and NI-488.2.
NI I/O Trace highlights functions that return errors, so you can quickly determine which functions failed during your development. NI I/O Trace can also log your program's calls to these drivers into a file so you can check them for errors at your convenience.
Interactive Control of VISA
NI-VISA comes with a utility called VISA Interactive Control (VISAIC) on Windows and Linux. This utility gives you access to all VISA functionality interactively in an easy-to-use graphical environment. It is a convenient starting point for program development and learning about VISA.
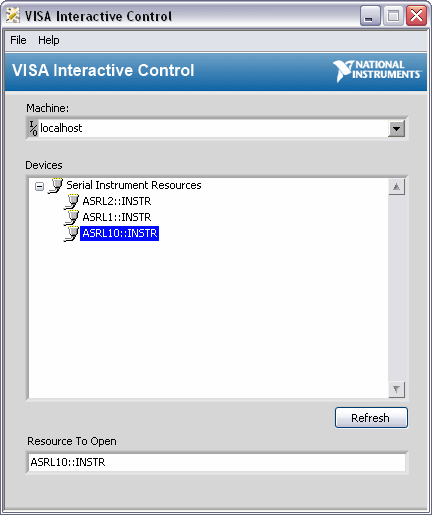
VISAIC Window
The Resource to Open control in VISAIC is a string control for using VISA expressions to find specific instruments. Refer to viFindRsrc for information about creating custom expressions. You also can select a resource from the Devices listbox to populate the Resource to Open string control.
Double-clicking on any of the instrument descriptors shown in the VISAIC window opens a session to that instrument. Opening a session to the instrument launches a window with a series of tabs for interactively running VISA commands. You also can click the Open VISA Test Panel button in Measurement & Automation Explorer (MAX) to open a session to the instrument.
When a session to a resource is opened interactively, a window similar to the following appears.

The VISAIC Test Panel includes the following pages:
- Configuration—Contains all of the attributes that can be configured or set for the opened resource. The attributes are grouped together by category and separated into tabs. Open the View Attributes tab if you want to view all of the attributes for the selected resource.
-
Input/Output—Contains operations for message-based and
register-based resources. The Basic I/O tab is visible only
for message-based instruments, while the Register I/O tab
is visible only for register-based instruments. These tabs are visible only if
they apply to the selected bus or instrument type. Note The Input/Output page is disabled for backplane resources.
- Advanced—Contains all of the operations that deal with locks, triggers, and events. This page also contains low-level register I/O operations when applicable to the selected resource.
Measurement & Automation Explorer
(MAX)
Measurement & Automation Explorer (MAX) provides access to all NI DAQ, GPIB, IMAQ, IVI, Motion, VISA, and VXI devices. With MAX, you can configure NI hardware and software, add new channels, interfaces, and virtual instruments, execute system diagnostics, and view the devices and instruments connected to your system. Installs automatically with NI-VISA version 2.5 or later or NI-VXI version 3.0 or later. Available only for Win32-based operating systems.
Hardware Configuration Utility
(HWCU)
Hardware Configuration Utility is software for test engineers and technicians who need to visualize and configure hardware in their systems. Use Hardware Configuration Utility to view, configure connected NI hardware and manage NI-VISA security credentials.
visaconf
visaconf is the VISA configuration utility for Linux and Mac OS X.
NI-VISA Driver Wizard Overview
To make your PXI/PCI or USB device visible to NI-VISA applications, the operating system (OS) must know to associate your hardware with the NI-VISA driver. This association is accomplished on Microsoft Windows operating systems using a Setup Information file (.inf file).
The NI-VISA Driver Wizard generates one .inf file for your PXI/PCI device for use on all supported operating systems. For a USB device, the wizard generates two .inf files, one for Windows XP/Server 2003 R2, the other for Windows 7 SP 1 and above. Using the wizard for a USB device is not necessary for use on Linux or Mac OS X. At this time, the list of supported operating systems includes Windows 10/8.1/7 SP1/Vista/XP/Server 2008 R2/Server 2003 R2, LabVIEW RT, Linux, and Mac OS X. The .inf file created by the wizard can then be distributed with an instrument driver distribution kit.