How the Block Diagram Cleanup Tool Works
The Block Diagram Cleanup tool organizes your LabVIEW code to make it easier to understand, but the functionality of your application remains exactly the same after using the tool, just as it does when using Clean Up Wire or Align Objects. There are three ways to perform a diagram cleanup:
-
Click the Cleanup Diagram button on the block diagram toolbar
-
Select Edit»Cleanup Diagram from the block diagram menus
-
Use the Cleanup Diagram shortcut key by holding <CTRL-U>
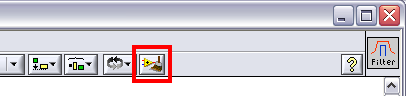 Figure 2. Use the Cleanup Diagram button on the block diagram toolbar or <CTRL-U>.
The Block Diagram Cleanup tool can be configured by selecting Tools»Options and choosing Block Diagram: Cleanup from the category list. For more information about each option, consult the LabVIEW Help.
 Figure 3. Customize cleanup settings including wire spacing, block spacing, and layout quality.
Enhancements in LabVIEW 2009
Inspired by feedback from the LabVIEW user community, NI added two significant capabilities to the Block Diagram Cleanup tool in LabVIEW 2009.
1. Clean Up Only What You Want
Cleaning up a block diagram in LabVIEW 8.6 was an all-or-nothing operation. With LabVIEW 2009, you can choose which elements of your diagram you want to clean up. Simply select a portion of code and click the toolbar icon to clean up just that area.
2. Protect Already Clean Code
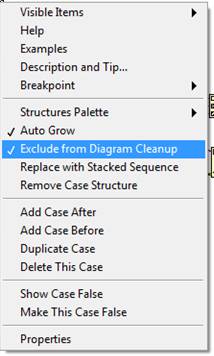
If you have a particular structure such as a while loop or case structure that is already organized, you can prevent the Block Diagram Cleanup tool from making any changes to your already clean code by right-clicking on the structure and selecting “Exclude from Diagram Cleanup.”
Tips and Tricks for Using the Block Diagram Cleanup Tool
It is important to note that the Block Diagram Cleanup tool cannot perfect the layout of your block diagram. Each user has unique preferences for object spacing, alignment, and density. The Block Diagram Cleanup tool significantly improves the appearance of your code, but it is most powerful when you use it with other tools such as Align Objects. For example, you can begin by selecting Cleanup Diagram and then use the Distribute Objects tool to make additional spacing adjustments.
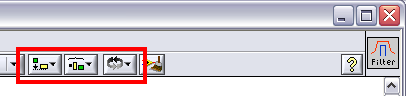 Figure 4. The Block Diagram Cleanup tool is most powerful when used with tools such as Align Objects.
Follow these tips to use the Block Diagram Cleanup tool successfully:
-
Always save a backup copy of the VIs you are cleaning for the first time with the Block Diagram Cleanup tool. You can also “Undo” (Edit»Undo Cleanup or <CTRL-Z>) a cleanup as long as you have not saved the VI since implementing the Cleanup Diagram function.
-
Choosing to “Fix controls to the left of the containing diagram” in the options menu means all controls. Take time to assess your block diagram before selecting this option to ensure this is your desired outcome. The same is true for the “Fix indicators to the right of the containing diagram” option.
-
LabVIEW considers object labels as part of a block diagram object. This means labels for objects such as controls and indicators are moved with their associated objects.
-
The Block Diagram Cleanup tool does not move free labels, such as text and comments added to your block diagram. Keep free label positions relatively intact by nesting them within a structure such as a while loop.
-
Once you are happy with the layout of a certain structure such as a while loop, you can right-click on the loop and select “Exclude from Diagram Cleanup” to prevent further modifications.
Develop Clean Code Quickly with the Block Diagram Cleanup Tool
You can use the Block Diagram Cleanup tool to rearrange just one area of your code or an entire block diagram in seconds with a single mouse click. Though the Block Diagram Cleanup tool is not intended to perfect the layout of your block diagram, configuration options do give you the ability to specify wire spacing, block spacing, and diagram compactness at the pixel level. When used with functionality like Align Objects and Quick Drop, the Block Diagram Cleanup tool becomes a powerful tool for developing clean code quickly.