From 11:00 PM CST Friday, Apr 11th - 1:30 PM CST Saturday, Apr 12th, ni.com will undergo system upgrades that may result in temporary service interruption.
We appreciate your patience as we improve our online experience.
From 11:00 PM CST Friday, Apr 11th - 1:30 PM CST Saturday, Apr 12th, ni.com will undergo system upgrades that may result in temporary service interruption.
We appreciate your patience as we improve our online experience.
The performance of your test system can significantly impact the productivity and cost of your manufacturing line. Slow test systems may require costly duplication or decrease test coverage, both of which can affect quality. Optimizing the performance of your test software performance can provide large gains in test time and more thorough testing using fewer test stations.
This article discusses some best practices for optimizing the performance of test stations developed with NI TestStand software. It is important to remember that no one solution works for every test system. Some approaches will decrease performance in certain test systems while increasing it in others. Take time to benchmark your test results before and after implementing any changes to your system so you can evaluate the potential benefits and drawbacks.
TestStand has several configuration options that can impact performance. The following sections describe those options.
Sequence tracing provides immediate feedback and status of the current operation, such as Pass, Fail, Error, or Skipped. However, sequence tracing impacts performance by decreasing execution speed. The following approaches can help you improve execution speed without sacrificing the benefits of sequence tracing.
To improve the performance when sequence tracing is enabled, set the tracing speed to fast to ensure that no additional delay is added between steps. Use the Execution tab of the Station Options dialog box to configure tracing, accessible using Configure» Station Options.
Even when set to the fastest speed, tracing adds a few milliseconds of overhead per step to update the Execution View pane after each step executes. For the fastest performance, you can completely disable tracing. However, if you disable sequence tracing, the execution view does not update as the sequence executes.
To balance performance with the usability benefits of tracing, use the Sequence call trace setting to disable tracing in specific subsequences. To use this approach, organize your tests into logical groups, and create subsequences for each. For example, in a test sequence for a mobile device, tests for each component such as the cellular data, user input, and audio systems can each be implemented in separate sequences. For each component’s SequenceCall step, disable tracing within the sequence call.
Organizing the test sequence in this way allows you to use sequence tracing for the top-level sequence without the performance overhead of tracing each substep. This approach can also be easily adapted to parallel testing, since you can call each subsequence asynchronously. Refer to the Improving Test Performance through Parallel Testing section for more information on parallelizing your test sequence.
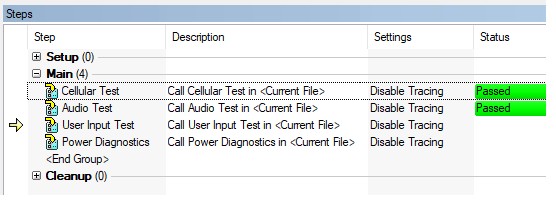
Use sequence call steps with tracing disabled to improve performance and see the execution state
TestStand allows you to configure when code modules are loaded into and unloaded from memory, which can have a significant impact on the memory usage and execution speed of a test sequence. Configuring modules to stay in memory longer will improve execution time since the modules will not need to be reloaded on subsequence executions. However, if too many modules are kept in memory, you can exceed the application memory limits or physical memory available, which can also slow execution.
Ideally, you can make improvements to your test system to increase memory limitations, rather than unloading code modules to conserve memory. For example:
If memory usage is still an issue, you can set the Load/Unload options at step level or at sequence file level. In most test systems, you can combine the Preload when opening sequence file or Preload when execution begins options with the Unload when sequence file is closed option for the best performance.
| Goal | Optimum Settings |
| Maximize Execution times | Use Preload when opening sequence file and Unload when sequence file is closed to keep modules in memory until the sequence is closed. Keeping modules loaded in memory increases speed for subsequent calls. |
| Reduce Memory Usage | Use Load Dynamically and Unload after Step Executes to remove modules from memory as soon as they are no longer in use. However, performance decreases because the module must be reloaded every time a step executes. This setting has additional risks, such as the potential to lose global data within a code module when that code module unloads. |
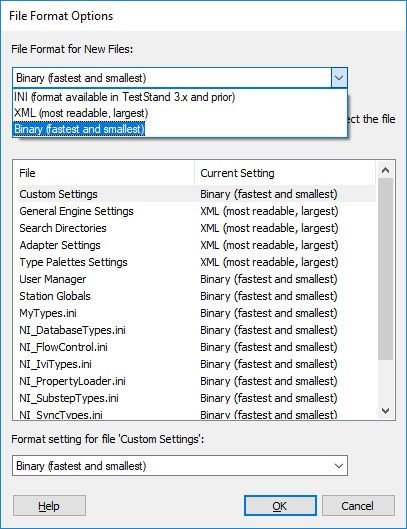
File format can affect speed and performance when loading large sequence files. TestStand allows you to save sequences in the following file formats: INI, XML, and binary.
To specify which format to use for new sequence files
To change the format of an existing sequence file:
Use the binary file format for the fastest sequence file load times
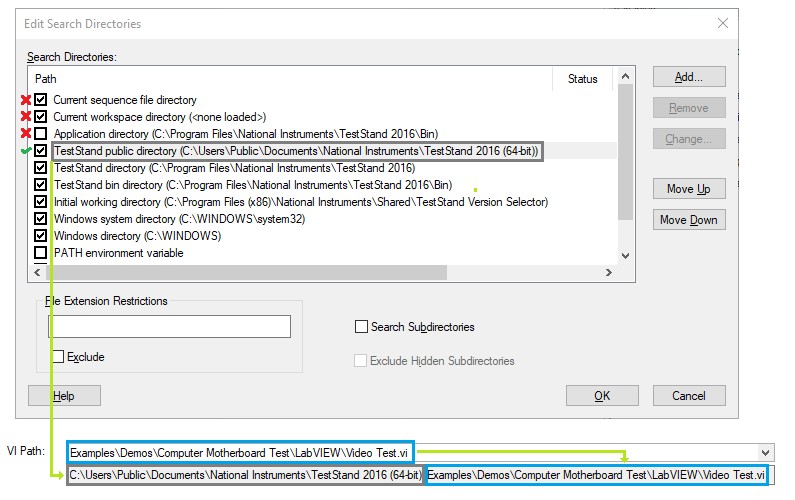
The search directory configuration directly affects the time required to load sequence files and code modules when they are specified with relative paths. The search directory configuration impacts the performance of the initial loading and execution of the tests, and subsequent iterations if modules are loaded dynamically. Use the search directory configuration dialog to view and edit the search directories. Select Configure»Search Directories to open the Edit Search Directories dialog box.
When resolving a code module relative path, TestStand uses the following procedure:
TestStand checks the list of search directories to resolve a relative path to a code module file
Since only a single path is calculated for each search directory, this process typically does not significantly impact performance.
However, if a search directory has the Search Subdirectories option, the process is repeated for every subdirectory within the specified path. If the path contains a large directory hierarchy, this option can severely impact performance. In addition, if multiple files with the same name exist within the hierarchy, the incorrect file can be loaded. For these reasons, avoid using this option for any search directories you add. Instead, ensure that all code module paths are specified using a relative path to the base search directory.
To further optimize the order of search directories, use the following guidelines:
When designing the directory structure for your test system, consider saving code modules in a directory beneath the sequence file path or in a specific code module location.
TestStand can call code modules in various development environments to perform test steps. The configuration of these code modules and development environments can have a large impact on performance. In any code module environment, you can achieve better performance by passing only the necessary data into and out of a code module. Avoid passing large amounts of data that will not be accessed or modified by the code module.
Compiled code modules, such as .NET assemblies or C/C++ DLLs, can reduce performance when you are using a debug version of the DLL rather than a release version. Typically, developers use debug DLLs in development to make it easier to find and correct problems in the modules. Once the test sequence is ready for deployment, switch to release DLLs to improve performance.
Because LabVIEW VIs are executed directly, they can be executed either in the LabVIEW development environment or the LabVIEW Runtime Engine. When you run LabVIEW VIs in the development environment, you can use debugging features to troubleshoot code module issues, but execution speed is slower. For production testing, use the LabVIEW Runtime engine to call VIs. You can configure which LabVIEW server is used to execute LabVIEW code using the LabVIEW adapter dialog:
To further optimize load times for LabVIEW code, you can build your code module VIs into Packed Project Libraries (PPLs). Because PPLs contain compiled versions of all VI dependencies of code module Vis, LabVIEW can load the dependencies into memory more quickly. Alternatively, if you deploy your code using the TestStand Deployment Utility, it can generate PPLs for your Vis as part of the deployment process.
For more information about using PPLs with the TestStand Deployment Utility, refer to the help topic Organizing Test Program Files with LabVIEW Packed Project Libraries.
You can often improve test speed by utilizing parallel testing to complete multiple tests simultaneously. TestStand provides features to help you parallelize the testing of a single UUT, or for testing multiple UUTs simultaneously.
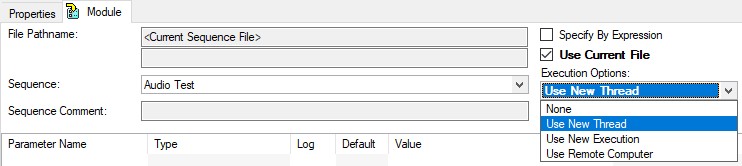
When testing a single UUT, you may be able to test multiple portions of the system at the same time. For example, consider the test sequence for a mobile device. Tests for each component such as the cellular data, user input, and audio systems can each be implemented in separate subsequences. Rather than calling each sequence sequentially, you can configure the sequence call step to call them asynchronously to speed up the test.
To specify that a sequence call should be executed asynchronously:
Calling a sequence in a new thread allows you to test different parts of a UUT simultaneously
When configuring asynchronous sequence calls, consider the differences between using a new thread versus a new execution:
| New Thread | New Execution |
| Shares the same results collection and report as the caller | Has its own results collection and report |
| Is executed directly | Can be executed using a process model entry point |
| Shares sequence file global values with caller | Has a new copy of Sequence File Global values |
| Is terminated or Suspended with the caller | Is independently Terminated or suspended |
Typically, you should use the new thread option for related tests within a test sequence. Using a new execution is more appropriate for more independent functionality, such as a status monitor which should run independently of the test sequence.
For more information on choosing whether to use a new thread or execution, refer to When to Run a Sequence in a New Execution versus in a New Thread.
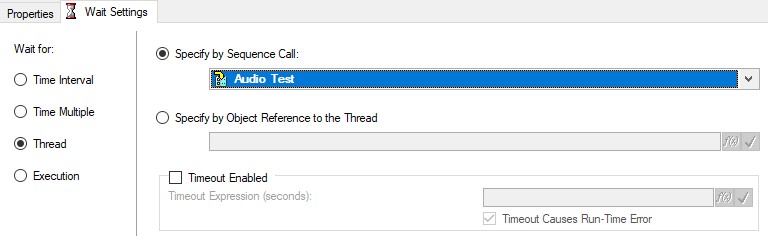
To obtain the results of your asynchronous subsequences for reporting or database logging, use Wait steps at the end of the launching sequence to wait for the asynchronous sequence calls to complete. Once the subsequence thread completes, TestStand attaches the results of the asynchronous subsequence to the Wait step results, making them available for report generation and database logging. To wait on a sequence execution or thread, select Execution or Thread in the Wait for control and specify the execution or thread to wait for. Keep in mind that adding this wait may cause a delay in execution if the calling sequence completes before the thread, so only use this approach when you need the results of the new thread
Use a wait step to obtain the results of an asynchronous sequence call
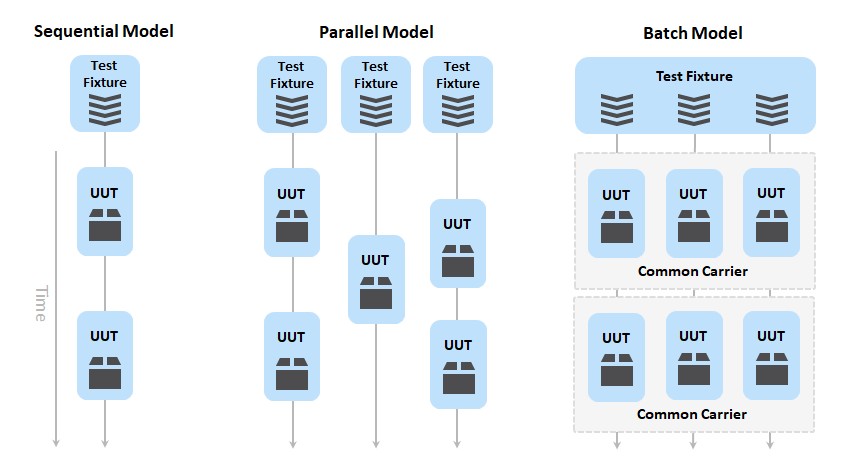
In addition to using asynchronous calls in your test sequence, TestStand allows you to test multiple UUTs in parallel using the Parallel and Batch Process Models. These process models create multiple executions which each run the test sequence on a separate UUT. You can change the process model for the current station or for an individual test sequence file.
Test multiple UUTs simultaneously using the parallel and batch process models
For a demonstration of how parallel testing can improve test times, refer to the Parallel Test Strategies Demo included with TestStand
While the Parallel process model allows you to start and finish tests of UUTs at different times, the Batch process model is designed to start and finish the test sequence on all UUTs at the same time.
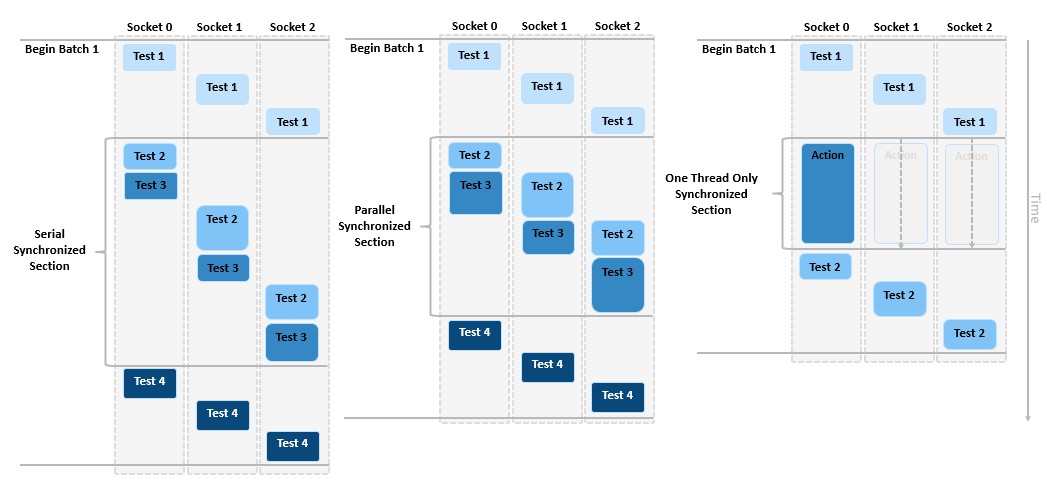
In addition to starting and ending each batch test at the same time, the batch process model allows you to use batch synchronization steps and settings to further synchronize testing across UUTs in the batch. If certain portions of the test should be run at the same time for all UUTs, you can define synchronized sections for a single step using the step settings, or for multiple steps using the batch synchronization step type.
Use batch synchronization to ensure that certain portions of the test are synchronized for all UUTs in the batch
For all types of batch synchronization sections, all sockets enter and exit the section together. You can further configure the synchronization to execute sequentially or only in a single thread.
For more information on batch synchronization, refer to the Synchronization Step Types – Batch Synchronization example
When testing multiple UUTs in parallel, the available testing hardware can become a performance bottleneck. When using a shared hardware resource, you must ensure that only one thread is accessing a shared hardware resource at any given time to avoid resource conflicts. Typically, you use the Lock settings or step types to reserve a shared resource. However, if multiple threads are waiting on a single resource to complete a test, many of the potential improvements of parallel test will not be realized. To mitigate this, you can use the following approaches:
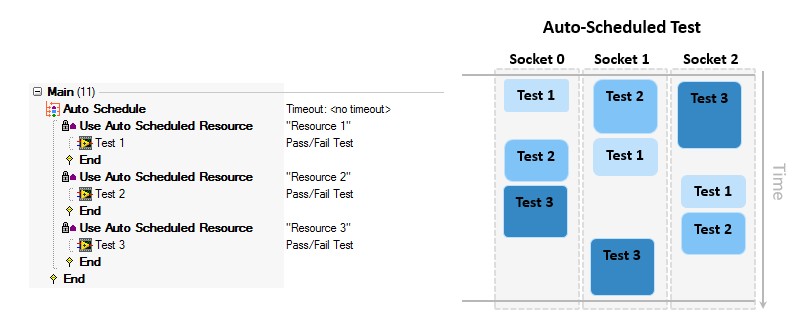
The Auto Schedule step type allows you to configure a set of tests that can be executed in any order to optimize test time and hardware utilization. When an auto Scheduled section is executed using the parallel or batch process model, each socket executes the first section which does not require a reserved resource. For this reason, the execution order can vary between different executions of the same test
Use the auto scheduler to optimize hardware utilization when execution order is not important
Use this approach when the execution order of tests is not important. If your test requires the test results to be presented in a specific order, do not use auto scheduling.
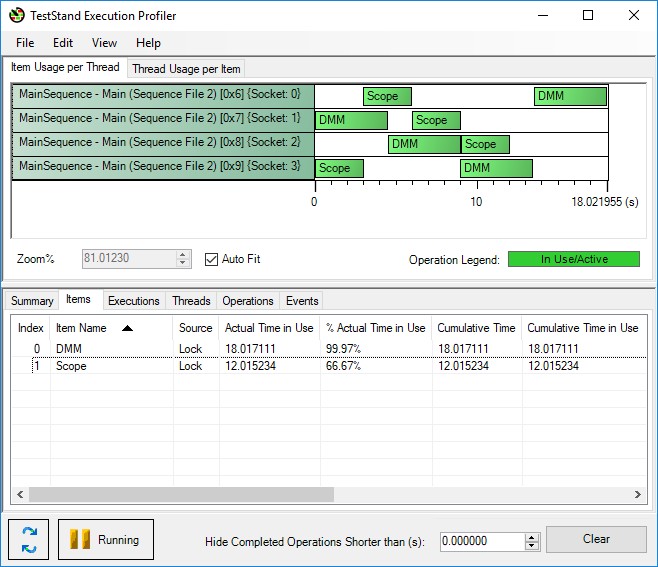
The execution profiler tool provided with TestStand is useful for identifying which test hardware is limiting the execution speed of the test system. Launch the profiler from the Sequence Editor using Tools » Profile Execution.
The profiler allows you to see how much time each hardware resource is active, allowing you to make informed decisions on the impact of adding hardware to the test system. In the example profile below, the DMM is fully utilized while the Scope is only 66% Utilized. Based on this profile, adding a second DMM or a DMM with more channels would improve the test time for this sequence.
The execution profiler allows you to visualize which resources are potential bottlenecks in your test configuration
You can improve test times by ensuring that you are interfacing with hardware in the most efficient way possible. This section discusses considerations for managing hardware references and measurement techniques to improve performance.
For any given hardware configuration, there are several common factors that can decrease test effectiveness. For example, you can use an oscilloscope to measure the rise time, fall time, RMS, and peak values of a signal. If you program the oscilloscope to capture the entire waveform, transfer the waveform to the test system, and then perform post-processing on the data to extract the desired measurements, you will experience decreased performance because of the large amount of data being transferred. Performance is also affected by the latency of the communication bus, so you should consider whether your instrument has a high-latency, such as a LAN or serial connection, or a low-latency bus like PCI or PXI.
If you configure the oscilloscope to measure the rise time, trigger an acquisition, read back the rise time from the instrument, and repeat for each measurement, you must then reconfigure and retrigger the oscilloscope for each measurement. This option also tends to be slow and inefficient.
Considering that many modern oscilloscopes have multiple measurement channels, use the following steps for faster test execution:
Frequently opening and closing sessions to hardware can cause slower performance: upon initializing communication with a device, many drivers transfer large amounts of data to verify communications and configurations. For this reason, it is best to initialize hardware only once per test, while maintaining a session handle which is used throughout the test to access the hardware.
To initialize hardware only once in a test, you can use the ProcessSetup process model callback, which runs before all test code. In the case of the parallel and batch process models, ProcessSetup executes only once regardless of the number of test sockets. To clean up references, you can use the ProcessCleanup callback, which executes once after all testing is completed. For more information on creating and using process model callbacks, refer to Using Callbacks in NI TestStand.
To access hardware sessions opened in a process model callback, you can use a file global variable which is shared between the callback sequence and the MainSequence. Alternatively, you can use the session manager, which can automatically manage hardware session lifetimes using an activeX object. Refer to the Session Manager Examples for more information on using the session manager.
There are a number of ways to optimize the impact of result collection on the performance of the system.
For the built in result processors, you can select the On-The-Fly option to perform logging as the sequence executes, rather than at the end of the test sequence. Consider these benefits and drawbacks when choosing whether to use this setting
Benefits of on-the-fly logging:
Drawbacks of on-the-fly logging:
If some reduction in speed is acceptable in order to gain the benefits of on-the-fly logging, you can mitigate the performance impact by adjusting the on-the-fly settings. To access these settings:
To improve performance, increase the processing interval and/or the Maximum number of Results to decrease the frequency which TestStand logs results.
To reduce time spent generating results, you can log result data in an offline results file, which is a fast and compact raw result format containing all the information TestStand requires to generate a report or log to a database. Since the file contains only raw result data, it takes less time to process and therefore can improve test throughput.
You use the Offline Results Processing Utility to process raw result files into a test report, or to log the data to a database. Because this is a separate utility, you can run it independently of testing, allowing you to process results at a later time or on a different computer. Use this utility in situations in which test system performance is more important than immediate report generation. For more information, refer to the TestStand Offline Results Processing Utility help.
Data stored locally to a hard drive is logged faster than data stored to a network location, though some network data transfer mechanisms are faster than others. For example, using Microsoft Message Queues (MSMQ) to communicate with a database creates local intermediate data files that are then transferred over the network. This is generally faster and safer than writing directly to the remote database. While TestStand does not provide native functionality for using MSMQ, third party tools to implement this type of communication are available.
Another factor to consider is the amount of data you are logging to the system. Performance decreases as the amount of logged data increases. In order to log only data you require, you can disable result recording for certain steps or sequences.
You can exclude recording results for individual steps by deselecting the Record Result option (Step»Properties»Run Options). You also can set an entire sequence to exclude result recording using the Disable Result Recording For All Steps setting on the Sequence Properties dialog box.
In a production environment, you may only need to know that a UUT failed any test, rather than knowing specifically which test failed. In those cases, you can terminate the test at the first failure to free system resources, and then obtain a more detailed failure analysis later.
Depending on your test, some failures may be more severe than others. You may want to terminate the test only when certain steps fail. You can configure the failure behavior for individual steps or sequences
To end the test on any failure for a specific step:
To end the test on any failure for a specific sequence:
You can also configure this setting for particular test stations, for example only terminating early on production test machines, while always completing the full test on diagnostic machines off the production line. To configure specific test machines to terminate on test failure: