Using the Unit Test Framework for Software Testing and Validation
Overview
|

Detecting and fixing bugs when developing software can be difficult, expensive and time-consuming; not surprisingly, validation can easily be many times more demanding and labor-intensive. As the complexity and sophistication of software in end-use applications increases, there is a need for more regimented and automated procedures to ensure thorough testing and help with code validation. Additionally, software used in test-fixtures for production of a critical or complex product faces increased scrutiny and therefore many of the same software engineering practices for testing and validation apply.
Contents
- Software Testing Tools for LabVIEW
- Introduction to Unit Testing
- Advanced Test Configuration Options
- Defining Test Requirements
- Requirements Coverage
- Running Tests
- Code Coverage: Ensuring All Code Has Been Tested
- Report Generation
- Conclusion
- Related Links
Requirements-based testing and validation is a well-recognized part of the software engineering process and standard practice for anyone who has to ‘prove it works.’ Proving software works is more complex than merely showing that the application runs; it requires validating that it works correctly. This task requires documentation and test results that demonstrate that the application behaves exactly in the way it was designed – evidence that may be required by the customer, a quality assurance group, or even regulatory authorities, such as the FDA or FAA.
Software Testing Tools for LabVIEW
For LabVIEW developers, there are many tools in the LabVIEW environment, as well as numerous other software engineering tools for advanced testing and code analysis. This paper discusses the Unit Test Framework, a tool for LabVIEW that can be used to automate unit testing, requirements-based validation and regression testing of VIs.
Introduction to Unit Testing
The idea behind unit testing is elegant and simple, but can be expanded to enable sophisticated series of tests for code validation and regression testing. A unit test is strictly something that ‘exercises’ or runs the code under test. Many developers manually perform unit testing on a regular basis in the course of working on a segment of code. In other words, it can be as simple as ‘I know the code should perform this task when I supply this input; I’ll try it and see what happens.’ If it doesn’t behave as expected, the developer would likely modify the code and repeat this iterative process until it works.
The problem with doing this manually is that it can easily overlook large ranges of values or different combinations of inputs and it offers no insight into how much of the code was actually executed during testing. Additionally, it does not help us with the important task of proving to someone else that it worked and that it worked correctly. The cost and time required is compounded by the reality that one round of testing is rarely enough; besides fixing bugs, any changes that are made to code later in the development process may require additional investment of time and resources to ensure it’s working properly.
Large projects typically augment manual procedures with tools such as the Unit Test Framework to automate and improve this process. Automation mitigates risk of undetected errors, saves costs by detecting problems early, and saves time by keeping developers focused on the task of writing the software, instead of performing the tests themselves.
Creating a Test for a LabVIEW VI
To create a test in LabVIEW using the Unit Test Framework, right click on the VI under test in the Project Explorer and move your cursor over the ‘Unit Tests’ menu item. Select ‘New Test’ to create a new file on disk with an .lvtest extension (see figure 1).
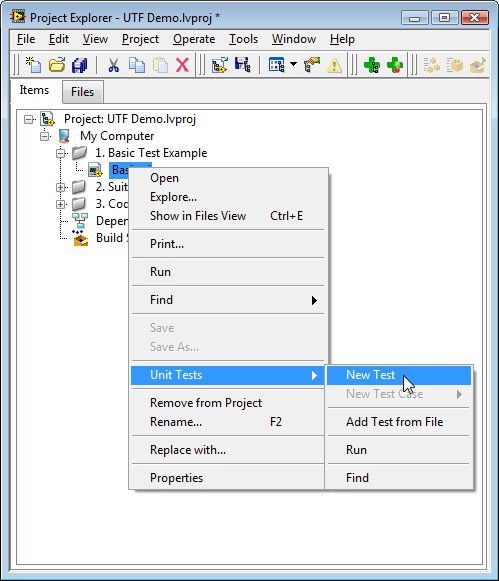
Figure 1: Automatically generate a test for a VI from the menu in the Project Explorer
By default, this file will be saved in the same location as the VI under test; however, .lvtest files can automatically be stored in a pre-determined location, as specified in the Unit Test Framework properties (available from the properties dialog that is available by right-clicking on the .lvproj file in the Project Explorer).
Defining Test Vectors
The next step in creating a test is the definition of a test vector or a test case. VIs, like a function call in text-based programming languages, have inputs and outputs. When a unit test is performed in LabVIEW, a known set of inputs is supplied to the VI. These inputs are paired with a pre-determined set of expected outputs to define a ‘test vector’. The output of the VI after execution is then compared with what was expected (see figure 2) to generate the results. The Unit Test Framework allows the creation of these tests without any modification to code.
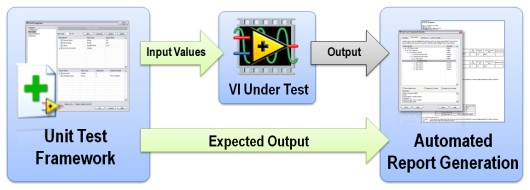
Figure 2: Test Vectors (or Test Cases) refer to the pairing of inputs for a unit of code with the expected output. Unit testing compares the expected results with the actual results to generate reports.
Test cases can be specified in a number of different ways using the Unit Test Framework. The most common mechanism is the dialog that appears in LabVIEW if you double click on an .lvtest file in the Project Explorer. In the dialog that appears, select ‘Test Cases’ from the list of categories to specify the inputs and expected outputs. By default, you can specify input values for all controls attached to the connector pane and specify expected output values for any indicators tied to the connector pane (see figure 3).
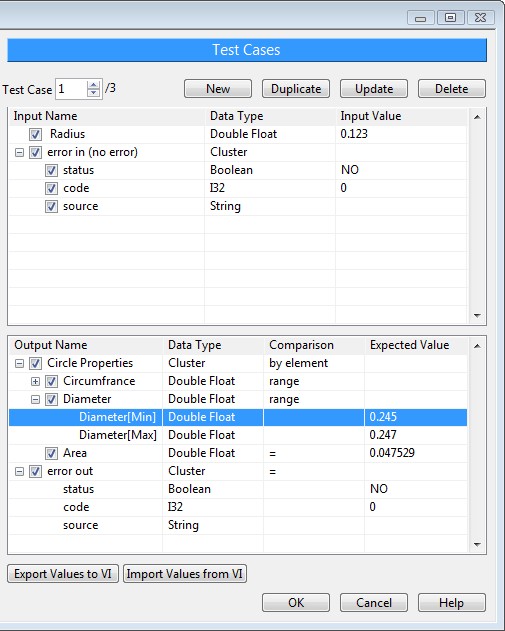
Figure 3: Setup test cases in the Unit Test Framework dialog by double-clicking a test in the Project Explorer
The comparison that is performed on the output is specific to the data-type.
If you have additional inputs that are not attached to the connector pane, or if you wish to evaluate inputs as outputs, you may configure this from the advanced category under the configuration options (see figure 4). Outputs may also be excluded from comparison by deselecting the checkmark next to the line in the Test Case.

Figure 4: The default behavior only uses controls and indicators on the connector pane for the test case. This can be extended to all controls and indicators by changing the advanced configuration.
As with any programming language, inputs that are unbounded have an infinite number of values. For this reason, inputs are typically selected that represent multiple values from a certain range, but completely exhaustive testing may not be possible.
One .lvtest file can contain multiple test cases. For example, you might create a test that evaluated the VI’s performance when it received incorrect input; however, there are likely numerous combinations of inputs that fall under this category and therefore would be a part of the same test, but each of which would require the definition of a new test case. To add additional test cases, click ‘New’ from the ‘Test Cases’ Category (see figure 5).
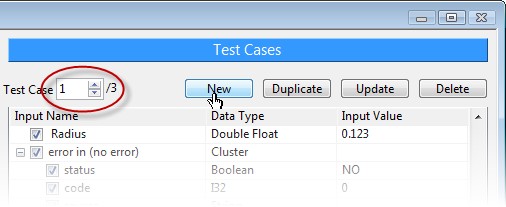
Figure 5: One test can contain multiple test cases
In addition to using the ‘Test Cases’ category of this dialog, test vectors can also be specified in an external editor, such as Microsoft Excel, to facilitate programmatic test creation. This feature also enables groups that may not have access to the development environment to define tests.
Advanced Test Configuration Options
VIs that have state or require programmatic configuration may require the use of ‘setup’ and ‘teardown’ VIs in order to perform testing. The output of the setup VI can be passed to the VI under test. This is valuable if you need to programmatically generate a complex input, such as a large waveform, or perhaps prepare a file or database for testing (see figure 6). It could also be used to pass in a reference to a file or object that you wanted the VI under test to use.
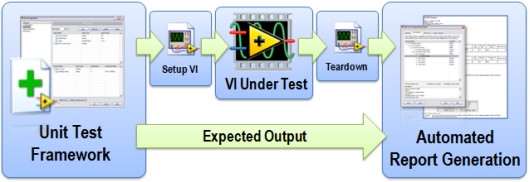
Figure 6: Use setup and teardown VIs to programmatically generate inputs or setup test conditions for more advanced test cases
Additionally, filters can be defined in order to only run tests that meet a certain priority or that have not been ran since a certain date.
Defining Test Requirements
Generating tests without first understanding what the code should do and how it should behave is typically ineffective, as it results in tests that cater to the developer’s criteria instead of the requirements for the application.
In order to avoid a scenario in which a developer is creating their own tests that are easily passed, due diligence must be given to requirements definition. For software engineers, the task of gathering requirements and defining specifications for code behavior is the first in a series of steps for software development. It is typically through this process that effective tests are defined and the expected behavior of code is determined.
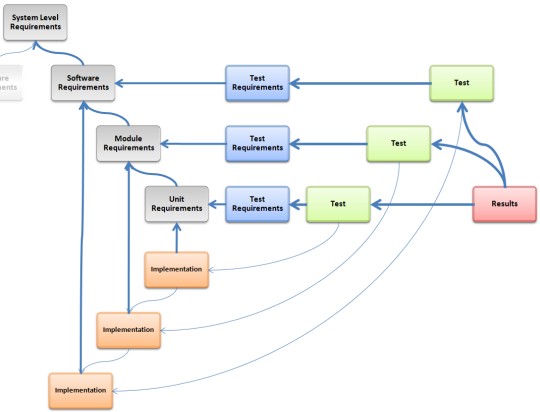
Figure 7: This is an example of the complex relationships that are present between requirements documents, implementations, unit tests and reports
Requirements for tests are often the product of iterative rounds of prototyping and proof of concepts that are shown to a customer in order to refine what the finished product will do. It is important to distinguish between these efforts to define the application’s behavior in requirements, and the process of developing a professional, high-quality, reliable piece of software.
High-risk or mission-critical projects will typically begin with requirements that go as far as to define how individual units of code will be implemented and what their specific output will be under normal conditions as well as erroneous conditions. It is from these definitions that the criteria for evaluating unit tests can be derived.
Requirements Coverage
A large part of software validation is the ability to demonstrate where and how requirements have been covered through implementation in software. For many, this requires the creation of a traceability matrix, which pairs the requirement with the location in the code where the requirement was covered. Depending upon the level of scrutiny, it may also be necessary to demonstrate where tests for software have been implemented. For this reason, the Unit Test Framework enables developers to enter one or more Requirements IDs in the ‘Configuration’ category (see figure 8).
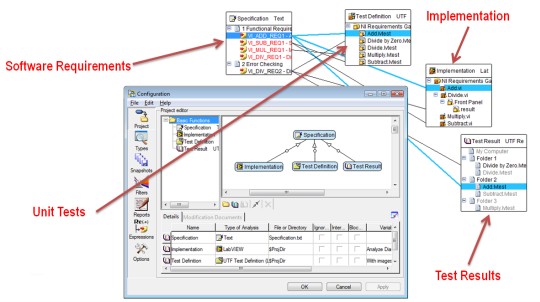
Figure 8: The Unit Test Framework integrates with Requirements Gateway to automate traceability to specifications for tests.
This requirement ID can be parsed by National Instrument’s requirements management tool, NI Requirements Gateway, to automate test requirements management and track coverage.
Learn how to couple NI Requirements Gateway with the Unit Test Framework Toolkit.
The requirements that define how code will be implemented and how tests will be performed are typically completed and considered ‘locked’ before development begins – especially when abiding by a test-driven development process model. However, the reality is that modifications to requirements are almost inevitable as a result of unforeseen changes or feature creep. For this reason, a combination of requirements management and configuration management tools are necessary towards providing insight into what code is impacted and therefore may need to be re-validated or tested.
Running Tests
Tests created using the LabVIEW Unit Test Framework can be run in a number of different ways:
- Individual Tests – right click on the test in the Project Explorer and select ‘run’
- By VI Under Test – rick click on the VI you wish you test, and navigate to ‘Unit Tests > Run’
- Tests In a Folder – right click on the folder and select ‘Unit Tests > Run’
- All Tests in the Project Explorer – Click on ‘Run Unit Tests’ in the toolbar of the Project Explorer
- Programmatically - Use the VIs on the Unit Test Framework Palette (see figure 9)
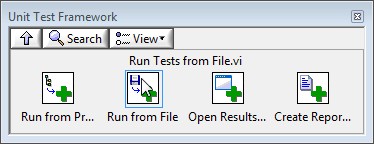
Figure 9: The Unit Test Framework installs a palette of VIs for automating test execution and report generation.
After tests have been run, whether or not they passed or failed is displayed on the icon using green and red dots to represent pass and fail (respectively). A dialog will appear with the results, and a report will be generated if report generation is turned on.
Code Coverage: Ensuring All Code Has Been Tested
Code coverage is a metric that is used to refer to the amount of code that was ‘covered’ or executed in the course of testing. Depending upon the level of complexity and criticality, some authorities mandate that all code be exercised in order to mitigate risk of un-tested code and application states that could result in unexpected behavior.
The LabVIEW Unit Test Framework tracks code coverage for every individual test vector. It aggregates these percentages across all tests to identify what code has been left uncovered. The Unit Test Framework Results Dialog lists all percentages and documents the uncovered code. Clicking on this list in the dialog displays and highlights the exact location of this code (see figure 10).
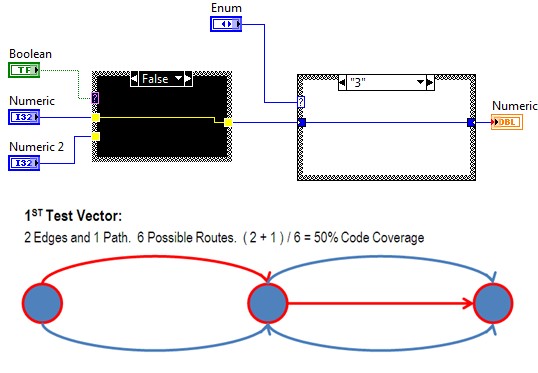
Figure 10: Track and identify code that has not be run during testing.
Report Generation
The ability to prove it works requires the creation of documentation or evidence that the software fulfills its intended purpose and meets all other criteria (see figure 11). The LabVIEW Unit Test Framework enables automated generation of documentation in XML (ATML), HTML or ASCII formats. Information included in this report can be configured, but typically includes the time of test, duration of each test, test vector inputs, the results, and aggregated code coverage metrics.
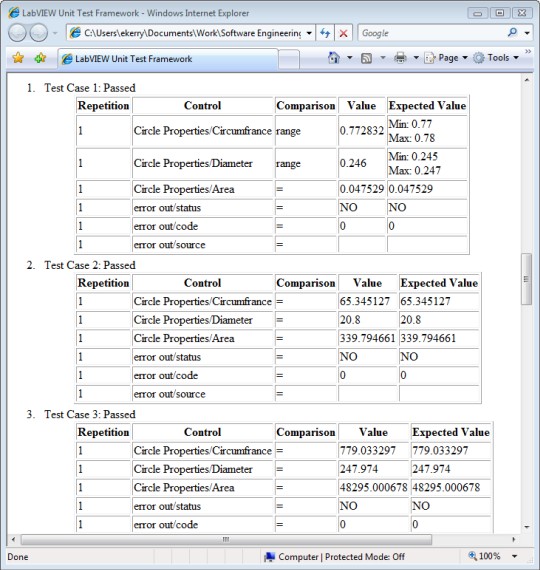
Figure 11: Reports are automatically generated by the Unit Test Framework to enumerate the test results. Pictures, arrays of clusters, and clusters of clusters will return a [...] in the report. All other data types will show the comparison values, as shown above.
Conclusion
Testing and debugging software has always been an inseparable part of the development process, but automated tools such as the LabVIEW Unit Test Framework are available to address the challenge of testing complex software. Automating this process reduces the amount of time developers spend performing tests and enables more exhaustive testing. This not only helps to ensure the highest-quality software possible is produced, but it also saves money by catching problems earlier and reducing the amount of time developers spend performing these tests.