TestStand Report Generation and Customization
Overview
A common requirement in automated test systems is to generate a complete report that contains all result information to answer the questions “What does the sequence test?” and “What results were achieved by each unit under test (UUT)?”.
This document provides information about TestStand reports, including configuring different report formats, including additional data in the report, and customizing the reports.
Contents
- How TestStand Generates Reports
- Customizing TestStand Reports
- Conclusion
- View Additional Sections of the TestStand Advanced Architecture Series
How TestStand Generates Reports
Before exploring the options available for TestStand report customization, it is important to first understand how the TestStand report generation process works.
TestStand uses a two-step approach for generating test reports:
- Result Collection: while the test executes, TestStand collects result data during the test execution. These consolidated results are used for all result processing, including report generation and database logging.
- Report Generation: the TestStand report generator uses the data gathered in the result collection process to generate the report file.
A diagram of this process is shown in the figure below:
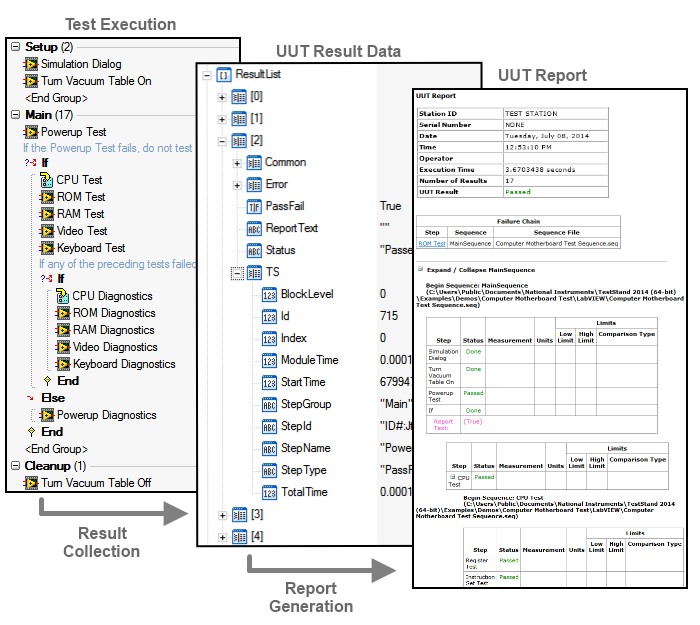
TestStand collects test results in the ResultList variable, which is used by the report generator to create a readable test report
Result Collection
As TestStand executes sequences, it collects step results and additional information to include in the report. Result collection is implemented directly by the TestStand engine and occurs independently of result processing, such as report generation or database logging.
The Locals.ResultList Property
Sequences use the Locals.ResultList, which is automatically created in all new sequences, to store the result data. TestStand populates the ResultList during the sequence execution and stores it in memory (RAM).
The ResultList local variable is initially an empty array of containers. After each step executes, TestStand appends a new container element to the end of the array to store the results of the executed step, and populates the data using two sources:
- Custom result properties: obtained from the Step.Result container of the executed step.
- Standard result properties: obtained from TestStand engine.
Custom Result Properties
Some data in the ResultList is obtained from the step properties. By default, only properties in the Result container of the step properties are included in the result collection. For example, two important elements in the step result container are:
- Result.Status: a string element that indicates the test result for the step.
- Result.Error: a container which stores error information about the step.
Step properties can vary based on the step type, and many step properties are present for only specific step types. For example, the property Step.Result.Numeric is specific to the Numeric Limit Test step type.
Standard Result Properties
In addition to copying step properties into the ResultList, TestStand also adds a set of Standard Result Properties to each step. The TestStand engine adds these results as subproperties of the Step.Result.TS property. These properties include identifying information about the step such as the step name, type, and timing information.
The diagram below shows how the ResultList is populated with step result properties and standard result properties.
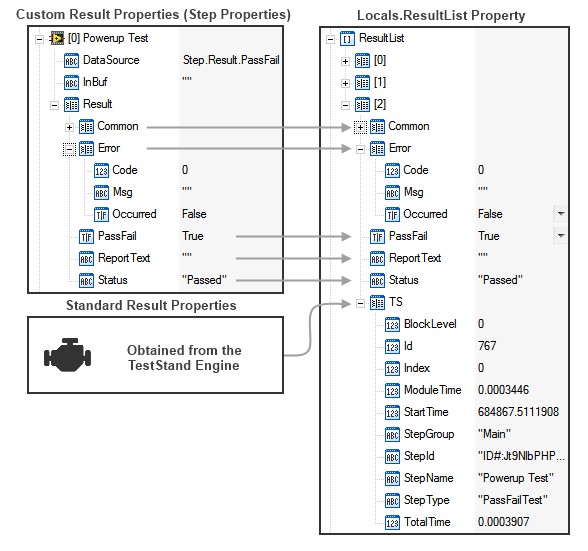
Result data is generated from custom result properties which depend on the step type, and standard result properties which are the same for all steps
Configuring Result Collection
Including Additional Properties in Result Collection
You can use the Execution.AddExtraResult method to add certain step properties to the ResultList. This method allows you to specify a property lookup string (for example "Step.myStepData") and includes this property in the result list for all steps in the execution which have the property. The method also allows you to specify the name to use for the property in the ResultList.
For Example, the process model calls the Execution.AddExtraResult method to include the Step.Limits and Step.Comp values in the ResultList. Since these properties are not in the Step.Result container, they are not collected by default. Because of this call, these properties will be added to the ResultList for all steps in the execution which contain these properties.
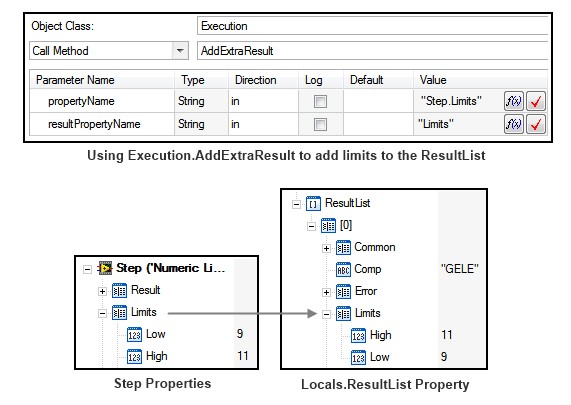
Use AddExtraResult to add additional step properties to the result list
For more information on other report properties, refer to the Custom Result Properties topic in the TestStand help.
Configuring When Results are Collected
TestStand result collection occurs independent of whether you generate a report or log to a database. In some cases, you may want to disable result collection for certain steps or sequences if the results do not need to be logged. The following settings are available to control which results are logged:
- Disable result recording for all sequences: located in the Execution tab of the station options, this setting completely disables all result collection. Use this setting if you are not logging any data using TestStand result processing.
- Disable result recording for all steps: located in the Sequence Properties, this setting disables result recording for a particular sequence.
- Step Result Recording Option: located in the Run Options in the Step properties pane, this option allows you to disable result recording for a particular step. By default, the Sequence setting above overrides this setting. However you can select the Enabled (Override Sequence Setting) to log results for a step within a sequence with result recording disabled.
If test system performance or system memory usage is a concern, consider disabling result recording for steps which execute frequently to prevent unnecessary storage of results.
Report Generation
Unlike the Result collection process which is a part of the TestStand engine, the report generator is implemented by the TestStand process models through the report generation plug-in. For detailed information on the implementation of the report generator, refer to the Report Generation Explained article.
The report generator uses the results data in the ResultList variable generated by the result collection process (refer to the Result Collection section of this document for more information) to generate the report. This section provides an overview of the default report generator in TestStand.
Flagging Data to be Included in the Report
The report generator uses the property flags of collected result properties in the ResultList to determine if they should be included in the report. Property flags allow you to configure the behavior of PropertyObjects, including how they are included in the test report.
The flags of a PropertyObject can be viewed and configured in one of two ways:
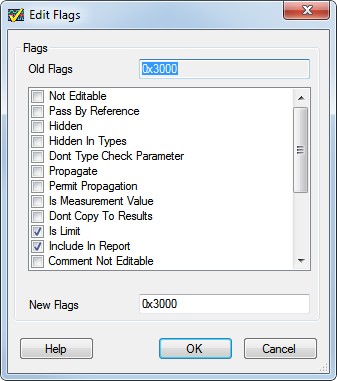
- Using the Sequence Editor: right click a property, then select Advanced » Edit Flags to view the Edit Flags dialog. The New Flags field displays the current sum of all selected flags.
Using the Edit Flags dialog to configure PropertyObject Flags
- Using the TestStand API: the PropertyObject.GetFlags and PropertyObject.SetFlags methods can be used to access the flag state and set the flag state, respectively.
Each flag has a unique value, and the current flag state of a property is the sum of all flag values. For example, a property with the PropFlags_IsLimit–(Value: 0x1000) and the PropFlags_IncludeInReport–(Value: 0x2000) flags enabled has a flags value of 0x3000. Refer to the PropertyFlags Constants help topic for additional information on each flag.
The flags below are used by the report generator to determine if collected results should be added to the report. Refer to Property Flags That Affect Reports for more information.
- The PropFlags_IncludeInReport flag indicates that the property is always included in the report.
- The PropFlags_IsLimit flag or PropFlags_IsMeasurementValue flag indicates that data should be included based on the current report options.
TestStand Report Formats
TestStand offers many report formats, each with advantages and disadvantages. The report generator calls format-specific sequence files to generate the report text (e.g. ReportGen_ATML.seq). More information on each report format is shown in the table below.
| Report Format | Readability | File Size | Performance | Parsing1 | Customizing |
|---|---|---|---|---|---|
| ASCII (.txt) basic text report format | Basic | Very Small | Fastest | Moderate - requires custom parser, but limited formatting information | Difficult - Requires overriding or modifying process model callbacks or DLLs/td> |
| HTML (.html) rich text report format | Rich Text | Large | Moderate | Difficult - Report data and formatting are tightly coupled, requires custom parser | Difficult - Requires overriding or modifying process model sequences or DLLs |
| XML (.xml) Data-only file format using XSL style sheet to generate rich text | Rich Text | Largest | Slowest | Easy - Uses standard XML schema, which is easily parsed using an API for XML | Moderate - use stylesheets to customize formatting with no process model changes |
| ATML (.xml) - Automated Test Markup Language | Rich Text | Moderate | Fast | Easy - Uses standard XML schema, which is easily parsed using an API for XML | Moderate - use stylesheets to customize formatting with no process model changes |
1 You can use report files for automated report analysis, especially XML and ATML report files, but using databases for automated analysis is typically more efficient. Refer to the Database Logging help topic for more information on TestStand features for logging to a database.
Starting with TestStand 2019, you also have the option to generate a PDF report for each report format except ASCII (.txt). For more information, please see PDF Report Generation.
For more detailed information on choosing the best report generation strategy for your application, refer to Choosing the Appropriate NI TestStand Report Generation Strategy.
Generating Reports On-The-Fly
When you enable On-The-Fly Reporting option on the Contents tab of the Report Options dialog box, the process models progressively generate the report concurrently with the execution instead of waiting until UUT testing completes. When you use on-the-fly reporting, you can click the Report pane of the Execution window to view the report during the execution. Because the report is being updated as the test executes, the report view periodically updates with new results as the test sequence executes.
Typically, on-the-fly reporting is a better choice for longer tests where test throughput is not as significant a concern as memory usage and data loss prevention.
| Advantages | Disadvantages |
|---|---|
|
|
1Preventing memory growth requires additional configuration. Refer to Addressing Memory Issues with Report Generation in TestStand for more information on how to prevent memory growth in report generation.
2This issue is mitigated in TestStand 2012 and later, which provide settings to configure the frequency that the on-the-fly report generator regenerates the report. Refer to the Advanced Result Processing Settings Dialog Box help topic for more information on these settings. By default, TestStand 2012 and later generates and persists the on-the-fly report after collecting 500 step results or after every 1.5 seconds of execution time, whichever occurs first. In TestStand 2010 SP1 and previous, the report is regenerated after each step.
Asynchronous Report Generation
In TestStand 2012 and later, the report generator (and other result processing plug-ins) can be executed asynchronously to improve test throughput. To configure this option, select Configure » Result Processing, and select the Show More Options checkbox. The New Thread column indicates the current setting for each plug-in.
When using this feature, the execution can immediately begin testing the next UUT while generating the report for the current UUT, as shown in the image below.
Note: Asynchronous reporting is not available when generating reports on-the-fly.
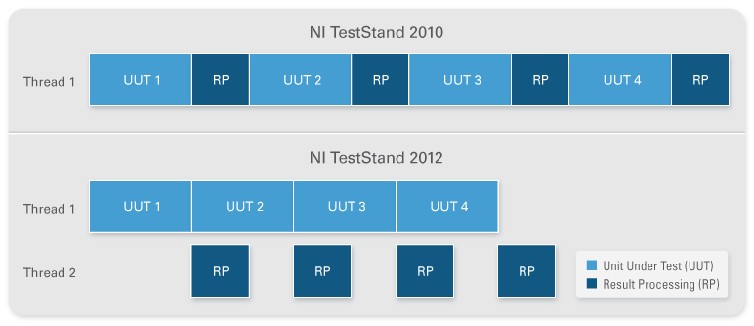
Asynchronous result processing allows faster test throughput, since testing of the next unit can start immediately
Customizing TestStand Reports
The TestStand report generation process is highly customizable, allowing you to tailor the generated report to the requirements of your TestStand application. Use the following approaches when customizing the report:
- Configure the report options to make customizations with no code changes.
- Use built-in TestStand features for logging additional data to the report.
- Modify style sheets and/or override report generation callbacks to implement more significant changes to the report appearance.
Using the Report Options Dialog
TestStand Reports can be customized with no code changes using the report generation options accessed through the Report Options dialog. To access the dialog in TestStand 2012 and later, navigate to Configure » Result Processing to launch the Report Options dialog, then select the Settings icon for the Report Generation plug-in. In TestStand 2010 SP1 and previous, select Configure » Report Options.
You can use the report options dialog to configure the report in the following ways:
- Change the format of the report
- Filter the report to include specific types of Step results
- Configure the appearance of the report
- Enable On-The-Fly report generation
The following sections provide detail on each of these types of configuration.
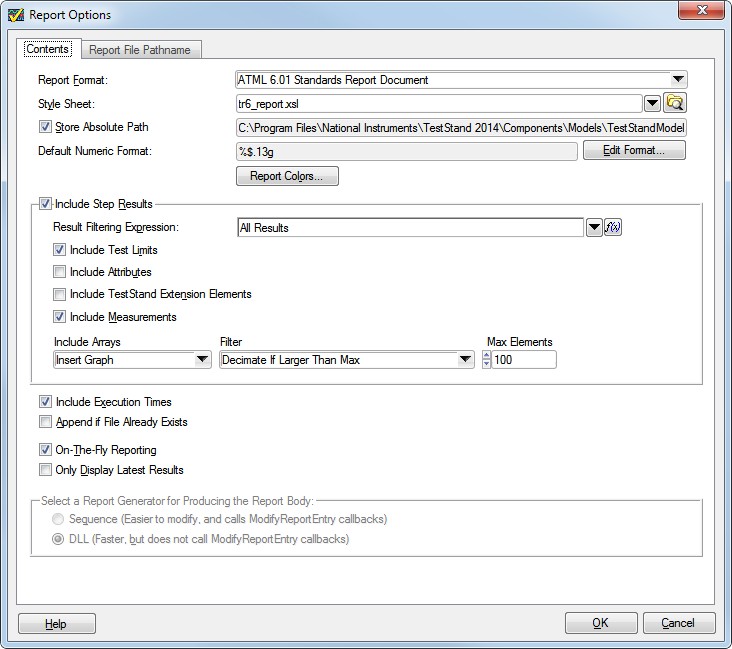
Report Options Dialog Box – Content Tab
Report Format
The Report Options dialog allows you to select the format of the report. For more information on the available report formats, refer to the Report Format section of the report generation section of this document. Some report options are only available for certain report formats.
ASCII and HTML Specific Report Options
ASCII and HTML reports can be generated in one of two ways:
- Using sequences: the report is generated by sequences in the ReportGen_txt.seq or ReportGen_html.seq sequence files. This method allows you to customize the report generator more easily by modifying or overriding the report generation sequences, but executes slower. This option is recommended if you plan to customize the report generator.
- Using a DLL: the report is generated using the modelsupport2.dll, which offers faster performance, but is more difficult to customize. This option is recommended if you plan to use the default report generator with very little or no customization.
XML and ATML Specific Report Options
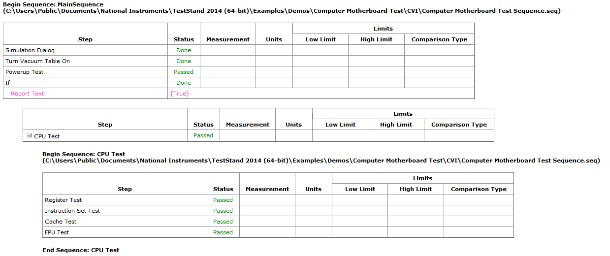
Unlike HTML reports, XML and ATML reports do not contain any formatting information. In order to present the raw data of the XML format in a readable report, an XSL style sheet is used. This style sheet defines the style of the report and pulls in data from the XML file. By using a style sheet, you can change the appearance of the report without any modification to the XML data file. For example, the images below show a sample of the same XML report using two different style sheets provided with TestStand.
TestStand provides a variety of style sheets you can use to display XML and ATML report data in different ways, which you can specify in the Report Options dialog. You can also create custom style sheets to use with your TestStand reports. For more information and examples of style sheet customization, refer to the XML Reports section of the TestStand Help.
ATML Report section using the Horizontal style sheet
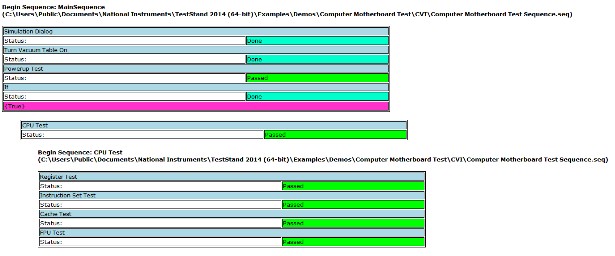
ATML Report section using the Report style sheet
Filtering Results
You can choose to filter specific types of step result information within the Report Options dialog, such as:
- Test limit values
- Test measurements
- Code module execution times
In addition, you can use the result filtering expression to create custom filters. TestStand evaluates this expression for each step result and includes the step in the report when the expression evaluates to True. Use the Result Filtering ring control to choose common expressions, such as excluding flow control steps (shown in the figure below).
Note: The result filtering expression is not available when using the XML format, or when using the ATML format with TestStand 2010 SP1 or previous. In these cases, you can filter results through modifying the report style sheet.

Changing the Report Appearance
The report options dialog provides settings for customizing the appearance of the report, including:
- Report Colors: Allows you to change the colors associated with various properties (not available for ASCII reports).
- Default Numeric Format: Configures how numeric data is represented in the report.
- Array Data Format: Select whether to include arrays in the report as a table, as a graph, or to omit them entirely.
Note: TestStand reports use an ActiveX control to generate graphs from array data. If this control is unavailable when viewing the report, the data will still be viewable as a table.
Configuring the Report File Pathname
On the Report File Pathname tab of the Report Options dialog, you can configure the name of the report file and the path where it is stored. Use the File/Directory options to select the location to store the report, then use the UUT Report field to preview the report file name based on the options you have selected.
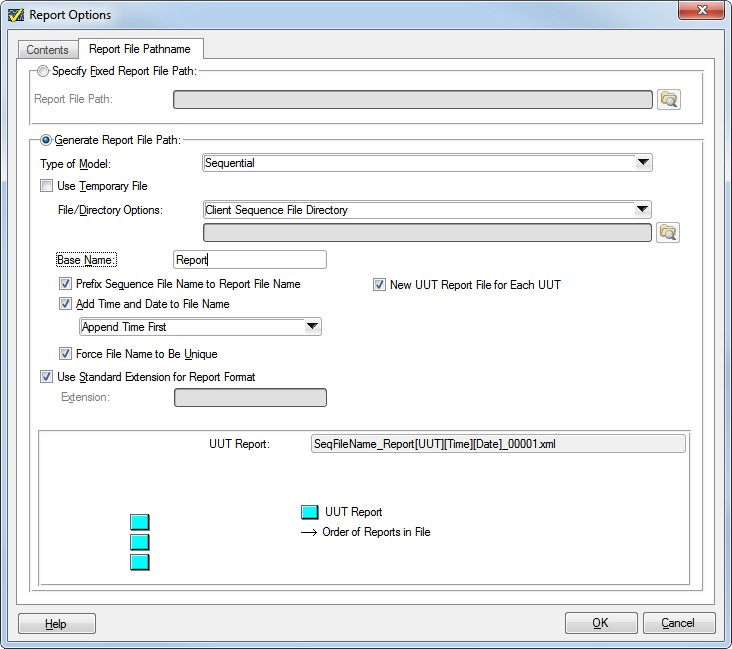
You can further control the report file name and path by selecting Specify Report File Path by Expression option in the File/Directory Options control. Using this setting, you can create an expression which TestStand evaluates to determine where the report is stored. This expression can include predefined macros, accessible in the Menu of the Report File Path control.
Note: When configuring the report expression, use the Evaluated Report File Path field and the preview image to see the behavior of the current expression.
Sorting Report Files Based on UUT Results
You can create separate file locations for passing and failing reports by using the UUTStatus macro in the report file path expression. For example, you can use this macro in your file path to create different locations for passing and failing reports. When this macro is present, TestStand re-evaluates the report file path expression after the test execution completes, since the UUT status is unknown before this point.
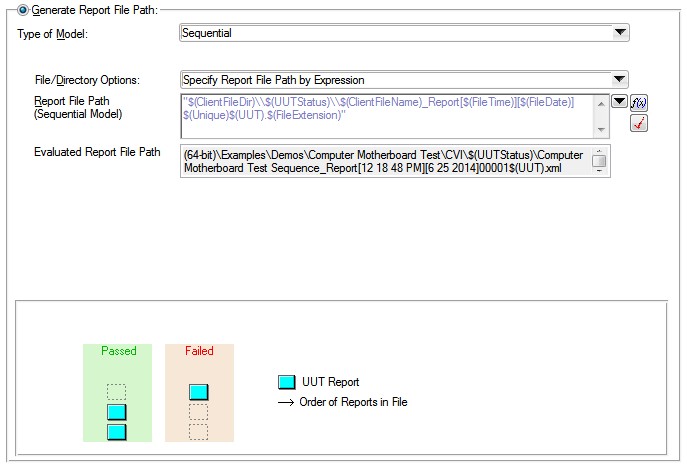
Configuring a Different Report File Pathname Based on the UUT Result
For tests using the batch process model, you can further configure the report file path behavior for batches and individual UUTs within the batch. To access these settings, select batch in the Type of Model field. For example, the New UUT Report for each batch setting allows you to create a separate report file for each batch. For more information on all available settings, refer to the Report Options Dialog Box help topic.
Features for Adding Custom Data to the Report
In many cases, a test application will require that you log additional data in the report beyond the results that TestStand logs by default. To address this need, TestStand provides several built-in features to easily log custom data to the report:
- Parameter Logging
- Additional Results
- ReportText property
- Configuring report data for custom step types
The following sections contain more details on these features.
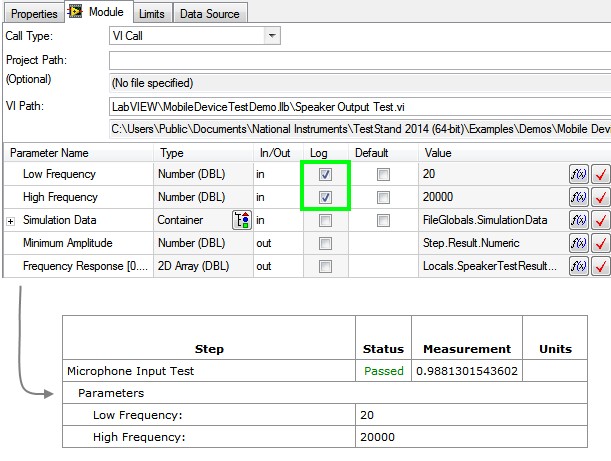
Parameter Logging
You can easily log parameter data for your test steps by selecting the Log box within the Module tab when configuring code module parameters, as shown below. Enabling this check-box configures the parameter selected to show up in Reports or Database Logs automatically with no further configuration.
Code Module - Enable Log Check-Box
Additional Results
You can include additional custom data for any step results using the Additional Results panel, located in the Properties tab of the Step Settings pane, as shown below.
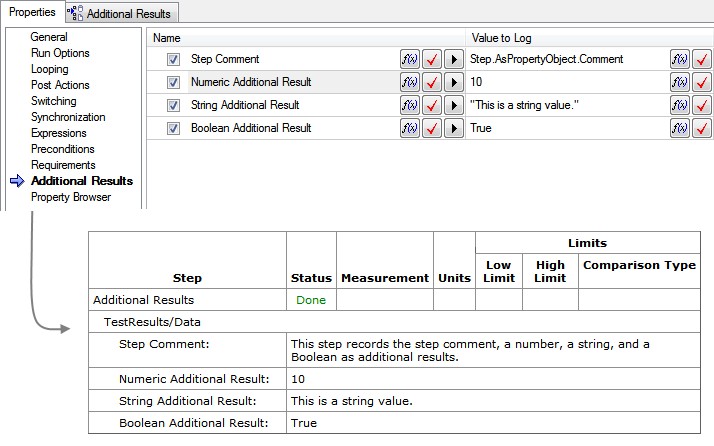
Configuring Additional Results
TestStand provides several preconfigured additional results to log common properties, such as the step comment and requirements information. To access these preconfigured results, select the Add Result From List button and choose an item from the list. You can also specify a condition expression for each additional result entry. The result will only be logged if the expression evaluates to True.
For more information on additional results settings, refer to the Additional Results Edit Tab topic in the TestStand help.
Using Result.ReportText
Result.ReportText is an additional string element in the Result container to store custom information for the step. If the string is not empty, the report generator includes the ReportText string as a field in the report.. The ReportText field supports HTML tags for all report formats except ASCII, so you can use this field to include rich text elements, such as related images or hyperlinks.
For more information on how to insert an image into a report, refer to Inserting Images into a TestStand Report.
The image below shows an example of embedding an image in a step result using HTML in the ReportText property.
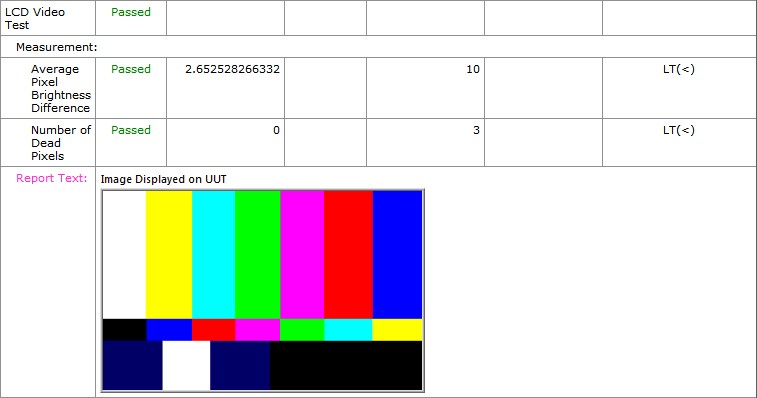
Report That displays an image in Result.ReportText
Adding Custom Step Type Properties to the Report
TestStand allows you to create your own custom step types to implement specific functionality. In this case, it is often necessary to log custom step type data to the report.
Note: If you are not familiar with custom step types in TestStand, refer to the Best Practices for Custom Step Type Development article for more information before reading this section.
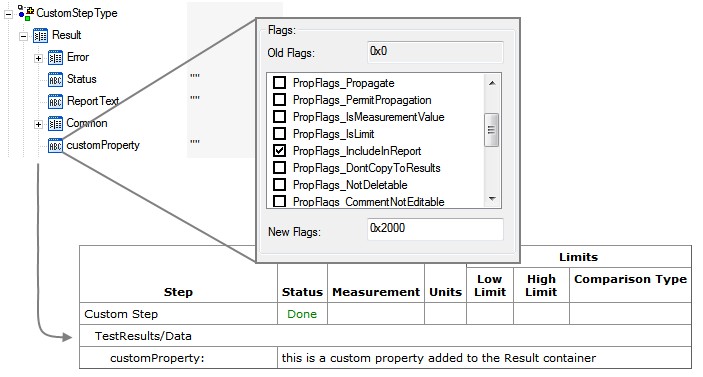
To create a custom step property which will appear in the report, follow these steps:
- In the Types pane, add a custom property to the Results container of the step. This will ensure that the property is added to the ResultList by the result collection process.
- Enable the IncludeInReport flag for the property so that the report generator adds the data to the report:
- Right click the property and select Properties...
- Click Advanced button, then select Flags...
- Check the IncludeInReport option, then click OK for both dialogs
Overriding Report Callbacks
The process models provide a number of callbacks that you can override to change model functionality for a particular client sequence file. This mechanism is useful for customizing the report generator as well. This section describes the following common customization methods:
- Setting Report Options Programmatically
- Adding additional UUT and Station data to the report
- Directly customizing the report generator
Note: If you are unfamiliar with process model callbacks, refer to the Using Callback Sequences to Modify Process Models help topic before continuing this section.
Setting Report Options Programmatically
In addition to using the Report Options dialog, you can set report options programmatically by overriding the ReportOptions callback in your test sequence. To override the callback in your sequence file, follow these steps:
- Right click in the sequences pane and select Sequence File Callbacks...
- Select the ReportOptions callback, then click Add.
- Click OK to dismiss the dialog. Notice that a new ReportOptions sequence has been created, as shown below.
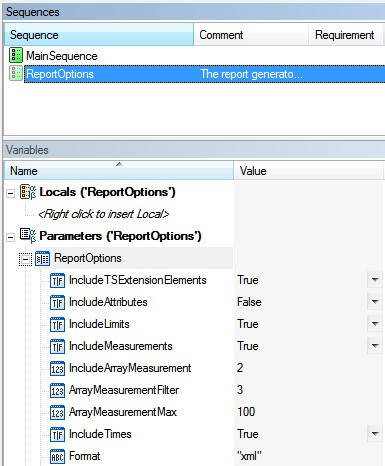
When you execute your sequence, the process model calls this callback sequence immediately after loading the current report options set in the report options dialog. The current report options are contained in the Parameters.ReportOptions variable. You can modify the values of these properties to change the report options for the current execution. These options do not affect the settings in the Report Options dialog or for any other executions. For example, to enable on-the-fly reporting for a sequence file, you can create a statement step with the following expression:
Parameters.ReportOptions.UseOnTheFlyReporting =True
Logging Additional UUT and Station Data to the Report Header (TestStand 2013 and Later)
A testing application may require you to include additional identifying information about the UUT, such as the manufacturer location. Data about the UUT and Station are stored by the process model in the Parameters.UUT and Parameters.ModelData.StationInfo variables. Most model callbacks you create contain these properties as parameters to allow you to access this data in the callback. In TestStand 2013 and later, the UUT and StationInfo properties contain an AdditionalData subproperty, which is an unstructured container. You can add data to this property at run-time without making any changes to the UUT and StationInfo data types.
To use the AdditionalData container to programmatically add custom UUT data to the header, follow these steps:
- Override the PreUUT Callback in the client sequence file. Note that the new callback sequence contains the Parameters.UUT property
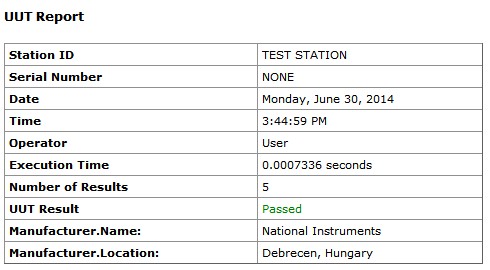
- Add a statement step to dynamically add a property in the Parameters.UUT.AdditionalData container. For example, this expression creates two string data subproperties:
Parameters.UUT.AdditionalData.SetValString("Manufacturer.Name",1,"National Instruments"),
Parameters.UUT.AdditionalData.SetValString("Manufacturer.Location",1,"Debrecen, Hungary"),
Note: Using the SetValString method with 1 as the PropertyOption creates a property if it does not exist
- Add a statement step to set the IncludeInReport flag for the AdditionalData property to include all subproperties in the Report:
Parameters.UUT.AdditionalData.SetFlags("",0,PropFlags_IncludeInReport)
The report below includes the custom data in the AdditionalData container. The process for adding custom Station data is similar, but uses the Parameters.ModelData.StationInfo property instead of Parameters.UUT.
Adding Manufacturer information to the report header using the UUT.AdditionalData container
Note: Alternatively, you can manually add data to and enable the IncludeInReport flag for the Locals.UUT or Locals.ModelData.StationInfo container of a process model entry point at edit-time to add UUT or Station data for all client sequence files.
Customizing the Report Generator Functionality Directly (HTML and ASCII formats)
The report generator defines many callbacks that you can override in a client sequence file. Each of these callbacks execute after the corresponding report text is generated, and allow you to modify the default output of the report generator. You should only use these callbacks to add custom data when none of the previously discussed methods are possible.
These callbacks execute only when you enable the Sequence option of the Select a Report Generator for Producing the Report Body option on the Contents tab of the Report Options dialog box. This option is available for HTML and ASCII reports.
- ModifyReportHeader: The report generator result processing component calls this from its Post sequence. Override it to modify the report header. The Parameters.ReportHeader property contains the default report header.
- ModifyReportEntry: The report generator result processing component calls this from its Post sequence for each result in the ResultList. Override it to modify the report section generated for each result. The Parameters.ReportEntry property contains the generated report data for the current ResultList entry.
- ModifyReportFooter: The report generator result processing component calls this from its Post Dequence. Override it to modify the report footer. The Parameters.ReportFooter property contains the default report header.
Customizing the Appearance of the Report
The method for customizing the appearance of the report is highly dependent on the report format. For ASCII and HTML reports, the appearance information and the report data are tightly coupled. As a result, changing the appearance of the report requires modifying the report generator code directly, which requires a low level understanding of the report generator, and is beyond the scope of this document. For more information on the implementation of the report generators, refer to the Report Generation Explained article.
As described in the Report Options section of this document, XML and ATML reports use style sheets to generate a readable report from the raw report data. You can customize the appearance of these reports by editing the style sheet, without the need to modify the report generator itself. For more information and examples of style sheet customization, refer to the XML Reports section of the TestStand Help.
Conclusion
Customizing reports in TestStand is a common task, and TestStand provides many features to customize the report content, functionality, and style. Refer to the flowchart below to help you make decisions about how to implement custom reports.
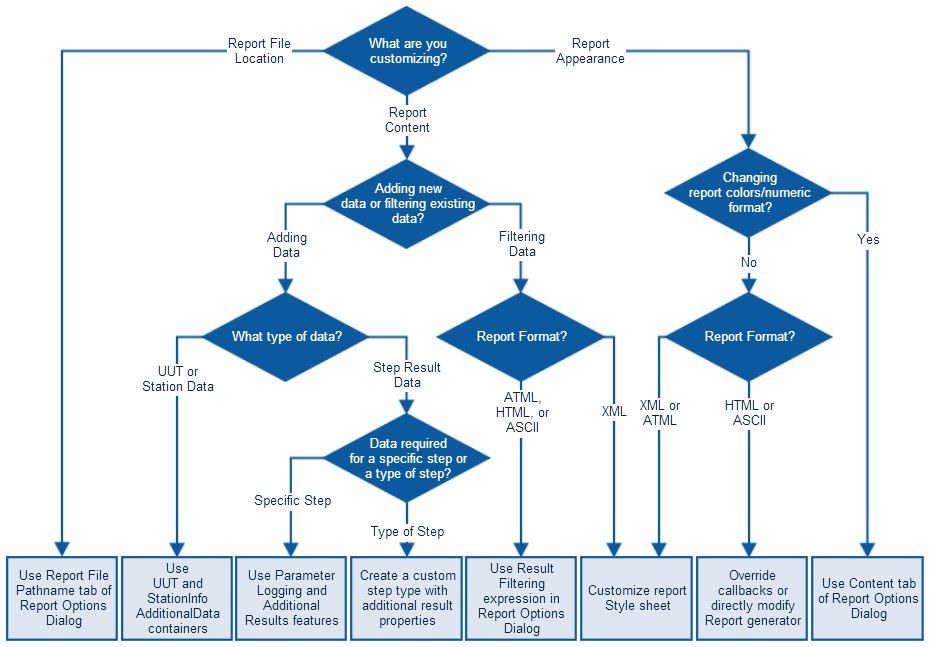
Flowchart for Selecting the Correct Technique to Customize Reports Flowchart for Selecting the Correct Technique to Customize Reports